
Simple Paper Sundials
Easy-to-make paper sundials for kids to cut out and assemble.
If you've tracked the sun across the sky in different seasons, you've discovered that the sun's path across the sky is not simple. It appears to be a portion of a circle, but the circle is tilted to a greater or lesser angle depending on your latitude on Earth. The circle also shifts to the north in the summer and to the south in winter (or vice versa if you live in the Southern Hemisphere), giving us our seasons. Making your own “sun-tracking” sundial that can follow the sun accurately at your location, through every hour of the day and through all of the solstices and equinoxes of the year, can be very rewarding. But it requires some patience, skill, and sophistication. What if you don't care about tracking the seasons, and you just want a simple way to mark the hours of the day? What if you just want to make a cheap, simple “sun clock” that everyone can have in their garden?
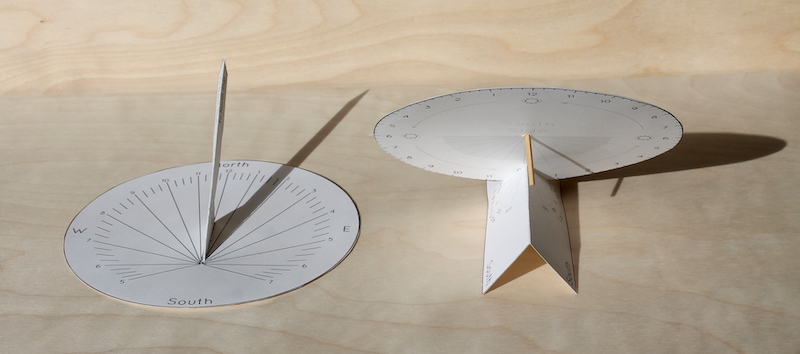
When most people nowadays think of “sundial,” they are probably thinking of a simple “garden variety” sundial, such as those shown in the picture below. The one on the left is a “traditional horizontal” design. Another simple design is the “equatorial” design shown on the right. (This photograph was taken in winter, which is why the shadow on the left is so long, even at 2 P.M., and why the sun is shining on the underside of the equatorial dial.)
The key change that turns a “sun-tracking” sundial into a simpler “time-keeping” sundial is to use an edge or a stick to cast the shadow, instead of a point. With “sun-tracking” sundials, we use the shadow of a tip or a point of some kind, and by the position of this shadow-point within a grid, we can read both the time and the season. With simplified “time-telling” sundials, we use a long shadow of an edge or a stick like the needle of a dial, or like the hand of a clock. We these designs, we can simply read the time by finding the position of the shadow along a ruler or a number line. This means that we can't figure out how long it will be until the next solstice or equinox any more, but it simplifies the design and it makes it much easier for a casual user to read the time.
But how can such a design tell time accurately, if the sun's circle in the sky is tilted, and also moves with the seasons? How can a simple design track a complicated thing? Notice that the shadow-casting sticks of both sundials in the picture above are (roughly) parallel to each other. For simple sundials to work properly, the trick is to line up the shadow-casting stick or edge with the axle of the sun's wheel, i.e. the axis of the sun's circles in the sky. This makes the shadow of the stick sweep around in circles, regardless of the season. (Or, if the sun is really standing still and it is really the Earth that is spinning, then you can say that the stick needs to be lined up with the axis of the Earth. Also, when you get tired of saying “shadow-stick” all the time, you can start using the formal name, and call it the “gnomon.” If you are using an edge instead of a point then you can also call it the “style” of the sundial. In a properly designed sundial, you can see which way the Earth's axis is pointing because it will be parallel to the style.)
The equatorial design is a simple “clock face,” but tilted to match the sun's circle in the sky. It is physically more complicated to make, but the marks are very simple. The marks are just evenly spaced, like the marks of a ruler or a normal clock. The horizontal design is easier to construct, but the marks are more complicated. You can find templates and instructions for both of these designs below, and they are both easy to make. (But if you wanted to adapt the design to metal or stone so that you could mount it permanently in your garden, then the horizontal design would probably be easier to construct.)
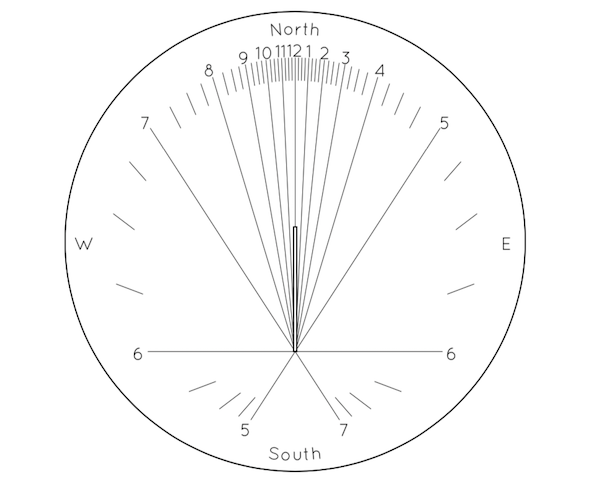
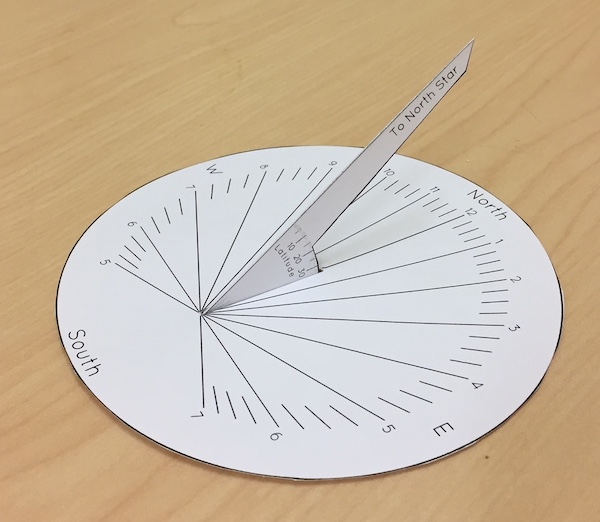
The equatorial design can be adapted to any location on Earth. You just need to tilt the wheel to your latitude, so that it lines up with the sun's circle in your sky. The horizontal design can also be adapted to different latitudes, except the design becomes very awkward if you live near the Equator. The shadow-stick or “style” needs to lie almost horizontally, and the marks become very squashed and unevenly spaced. For example, here's what the face of a traditional horizontal sundial designed for 10° north latitude would look like:
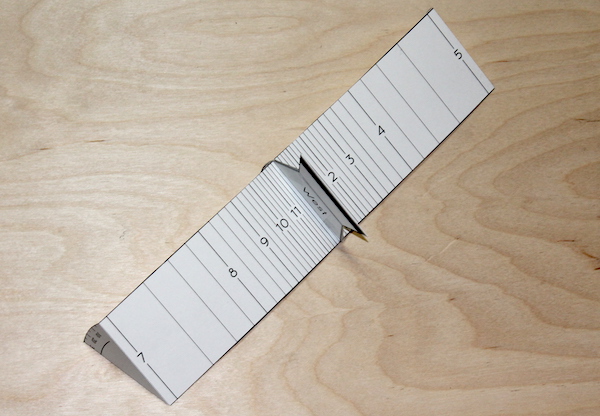
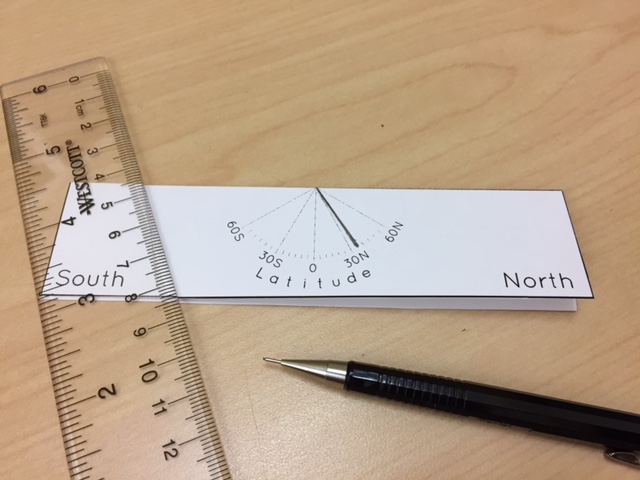
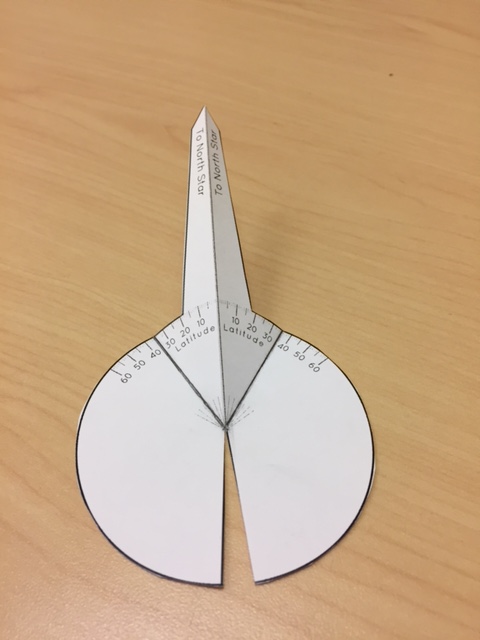
For latitudes near the Equator, a “polar” design is much better. In this design, you make the plate and the style parallel to each other, and you tilt both of them. This makes the design very long and thin and suitable for tracking the overhead path of the sun at the equator. (At the poles, the circular “clock-face” design is best. At the Equator, the linear “polar” design is best. In between, you get to choose.) Here's a paper polar sundial designed for 30° latitude:
If you keep reading, you will find templates and instructions for making all three of these very simple “time-telling” paper sundials. Let's start with the simple “tilted clock” design, or the “Equatorial Sundial.”
A Simple Equatorial Dial
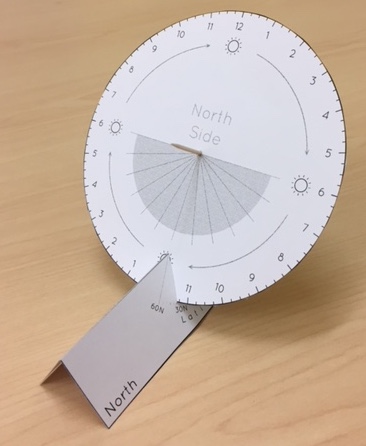
This is a very simple paper sundial for students to cut out and assemble. It is just like the “clock-face” paper plate sundial, except we tilt it so that it lines up with the sun's circle in the sky. It should take perhaps half of a class period to make, and requires only scissors and a toothpick. Assembly requires only cutting out a circle and a rectangle, making one fold, cutting one slit, and poking one hole.
This dial can be adapted to any latitude (except near the poles) simply by cutting the slot in the base at the appropriate angle.
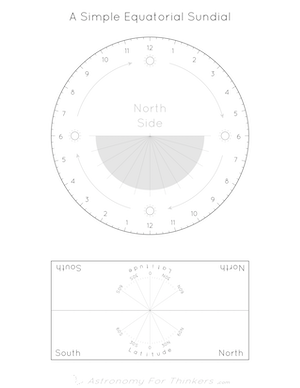
To make the dial, print out the design on card stock. The two faces of the dial are aligned so that you should be able to print it as one double-sided piece of paper, and cut out one double-sided dial, although I find that often printers don't align the two sides of a double-sided printout very well. You may prefer to print and cut the two sides of the dial separately, and then glue them back-to-back, although if you do this, make sure you line up the marks on both sides properly with each other. After cutting out the rectangular base, fold the base in half along the centerline. Scoring the fold line before folding with a ruler and a pin or dull blade of some kind helps to make a crisp, straight fold. Next, make an incision in the folded base at the appropriate angle for your latitude. Fasten a toothpick or pin in the center of the dial, and place the dial in the slot, with the north side facing north.
To use the dial, it needs to be placed in the sunshine with the gnomon pointing at the North Star (or the South Celestial Pole if you live in the southern hemisphere). In June, the sun should shine on the northern face all day long. In December, it should shine on the southern face, and at the equinoxes, it should pass exactly around the edge of the dial. (Thus, it can also serve as an “Equinotical ring,” showing you when the equinox occurs by the fact the that shadow has no width.)
A Simple Horizontal Sundial
This paper sundial has only two pieces to cut out and fold, and it should take less than a class period to construct. It requires scissors, a hobby knife (or a carpenter’s utility knife, or a scalpel if you have dissection supplies), and tape or glue.
There are two small steps that need a little bit of care. First, there is a slot to be cut out. Older children who can handle a hobby knife should have no trouble with it, but younger children should probably have help. Also, scoring the fold lines isn’t strictly necessary, but it is a great help in making the folds crisp and straight. Again, older children should have no problem with this, but younger children might need some guidance.
Every sundial must be designed for the latitude in which it is to be used, and in the download links you can find several versions that can be adapted to any latitude, except near the equator (where the gnomon would have to be horizontal) or near the poles (where it would have to be vertical). The “gnomon” or shadow-stick part needs to point at the North Star (or more precisely, the North Celestial Pole), meaning it needs to tilt up at an angle equal to your latitude. You handle this by constructing your own pair of fold lines on the gnomon at the appropriate latitude. Also, the hour-line marks will change gradually with latitude, so for the most accuracy, you will obviously want to choose the download page representing the latitude closest to you.
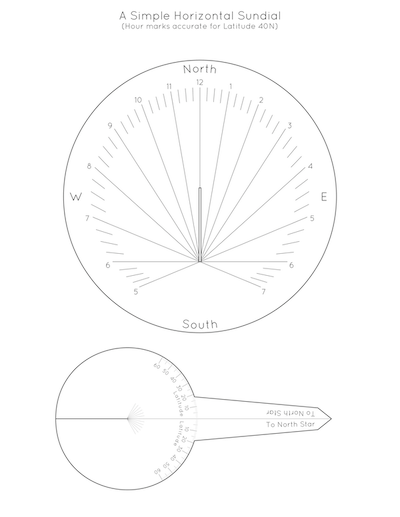
To make the dial, choose the page containing the nearest latitude to yours, and print it onto card stock. (If you don’t mind a floppy sundial that probably won’t last long, you could also just use normal paper.) Mark the fold lines for the gnomon before cutting it out. Draw a line on each side of the gnomon’s centerline, starting at the center, and ending at the appropriate latitude mark. These become the fold lines along which you will fold the paper to make the flaps that will rest against the bottom of the dial.
After marking the fold lines for the gnomon, cut out the two pieces of the sundial along the thick black lines, including the incision into the base of the gnomon, and the slot in the dial. If you wish to score the fold lines, place a ruler or other straight edge along the fold line, and run a pin or dull blade gently along the line. Fold the gnomon in half along the centerline, and fold up the two flaps resulting from the construction of the latitude lines. Insert the gnomon through the slot in the dial, and tape or glue it in place. If you live in the northern hemisphere, the tip of the gnomon must point north, and if you live in the southern hemisphere, it must point south.
Whenever the sundial is in the sunshine, and as long as it is turned the right way, it should give reasonably accurate “solar time.” In solar time, “noon” is the exact moment when the sun is due south, at the peak of its arc, exactly halfway between sunrise and sunset. Daylight Savings Time will shift clock time from solar time by an hour, and your longitude within your time zone will also shift your clock time away from solar time. If you live near the center of your time zone, and you are not on Daylight Savings Time, your sundial should give clock time to within 15 minutes or so.
A Simple Polar Sundial
This design is adaptable to any latitude, except the labels need to be reversed depending on which hemisphere you live in. Therefore, there are two versions, and you will need to download the one corresponding to your hemisphere. As with most of my printable stuff, you can try printing the design onto normal typing paper if you want to, but you'll get a much sturdier end product by using thicker card stock. (Although a very heavy weight may jam your printer. A medium weight is good enough.)
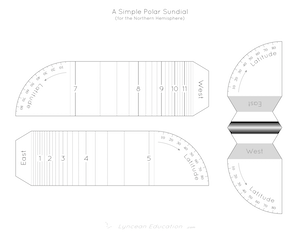

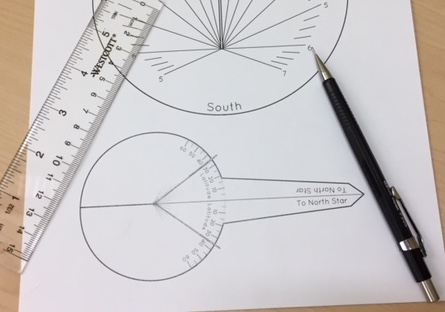
When cutting out the design, I suggest just doing a fast rough-cut first, then marking the latitude, and finally complete the trimming after you mark the latitude:
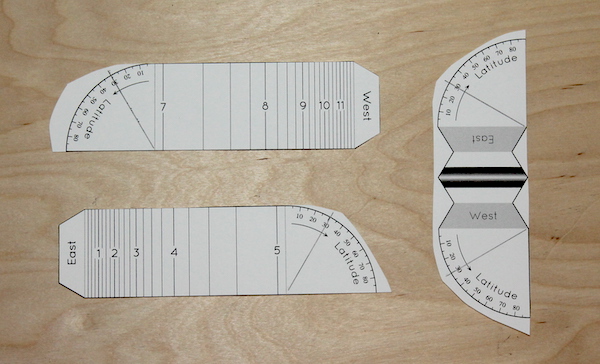
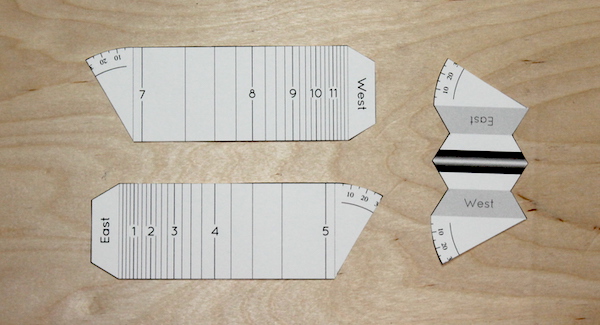
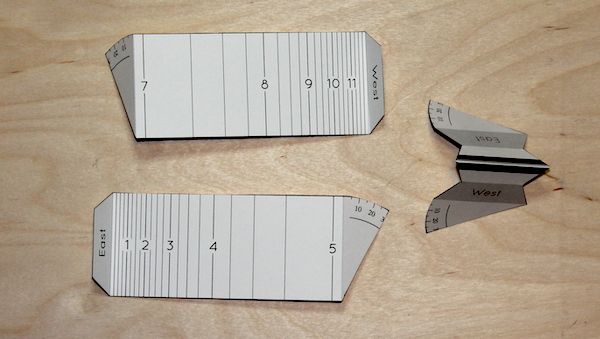
The gnomon needs to be folded in half, and the tabs marked “East” and “West” on the two halves of the plate need to be folded up and glued onto the corresponding space on the gnomon. The two ends will be larger or smaller depending on your latitude, and they will need to be folded down to serve as feet.