
A Paper Observatory
Make your own model of the horizon and the sky, with solar “horizon calendars” and the “solar highway” across the sky, for any latitude on Earth.
Sometimes the sun is higher in the sky, and sometimes it is lower. It also rises and sets at different places on the horizon in different months. The moon rises and sets in different places, too. Likewise with stars: some of them climb higher, some stay lower, and each of them has their own place on the horizon where they rise and set. Once we notice these things, it might become interesting to try to track everything, and to mark all of the special places on the horizon and in the sky. As I would say to my students: “Wouldn't it be fun if we could reach up with a giant marker, and draw marks on the sky? Then we could mark where the sun and moon are, and where they go. We could draw trails and record the tracks of everything in the sky. Well … if we can't do that, what can we do?”
One thing we could do would be to set up a special place from which to observe the sky — let's call it our observatory — and place stones in the ground to mark special directions, such as the sunrise on the summer solstice. We could make something like Stonehenge. Another thing we could do would be to set windows or ports in the walls of a round tower, allowing the light to shine through each window on special occasions. We could make something like Hovenweep Castle. After we develop some skill with geometry and angle measurement, we could set up compass roses, and sundials, and precision measurement instruments, and we could make a modern observatory.
Setting up your own observatory in your back yard, or in your school's playground, might be a fun project. If you'd like to try, then perhaps this paper model can give you an idea of what to expect. This paper model represents the horizon and the sky, with geometric markings representing the sun's path (and roughly the moon's path) in various seasons for a particular latitude on earth.
The Paper Observatory
To make the paper observatory, download the template for the latitude closest to your own, and then print both pages.
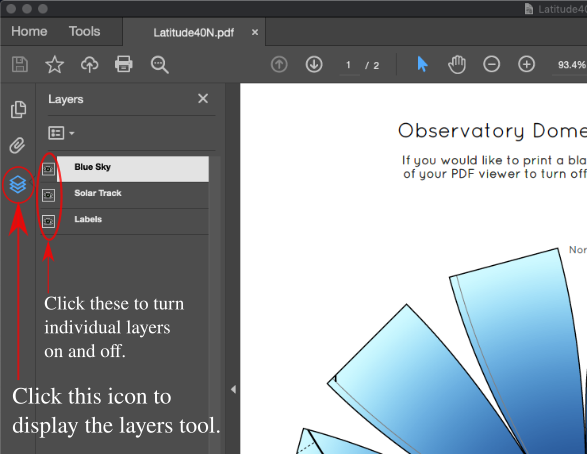
I recommend printing the two pages separately — the base will be stiffer and sturdier if you print the second page onto card stock, but the dome will be a little lighter and easier to assemble if you print the first page onto normal typing paper. You can even print the first page onto translucent vellum paper if you wish, making the dome of the sky slightly see-through. That's what I did to make the dome you see in the photos. If your PDF reader has a “layers” tool, you have the option to turn off the blue sky background, and also to turn off the “solar track,” if you want to conserve printer ink, or to print a blank dome for any reason. (Most PDF Readers have a layers tool, with Apple's Preview being a notable exception. If you don't have a layer-capable PDF Reader, Adobe's Acrobat Reader is free. To open the layers tool in Acrobat Reader, click on the layers
icon on the left-hand side, or from the “View” menu select “Show/Hide > Navigation Panes > Layers.”
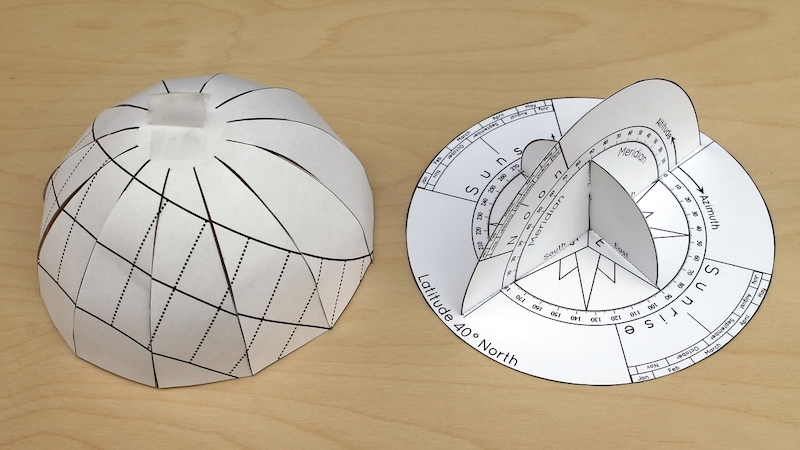
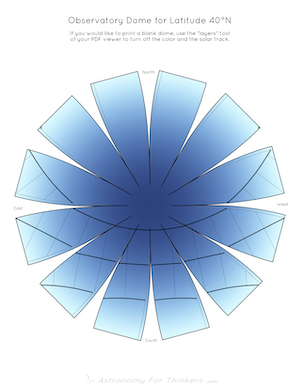
The Dome
To assemble the dome, cut out the star-shaped pattern around the outline, and then tape each petal to its neighbor at the base. I have included a slight overlap area along one edge of each petal to help hide the seams. I recommend applying a small piece of tape to the base of the petal with the overlap tab first, then lining up and attaching the neighbor petal. When you are finished, I also recommend applying a piece of folded tape to the top of the dome to use as a handle.
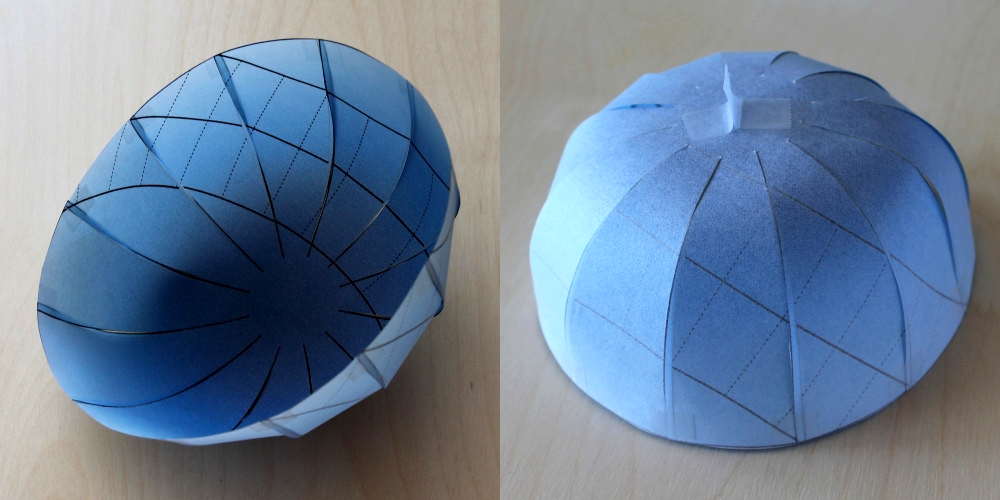
There is a half-circle that begins and ends at the left and right sides of the dome on the page, corresponding to due east and due west in the assembled dome. That is the equinox curve of the sun, and also the “equator of stars” in the night sky. Any star that lies along that curve will rise due east, make a semicircle in the sky, and set due west. The sun does the same thing during the day on the equinoxes.
The two parallel curves are the solstice curves, corresponding to the tropic of cancer and the tropic of capricorn. The sun will pass along these curves in summer and winter. (I don't yet have a good algorithm for splitting text across the “petals”, so I haven't included any text labels on the dome. You'll just have to figure out for yourself which curve is which. The summer curve is the longer one and the winter curve is the shorter one, but which one corresponds to which month depends on whether you live in the northern or southern hemisphere. And if you live near the equator, where there is little or no difference between June and December, the solstice curves will both look about the same.)
The dashed lines are the “hour lines.” When the sun is on the meridian (i.e., the vertical north-south plane) then it is noon. (More precisely, it is “solar noon,” the exact midpoint of the day according to the sun.) Each dashed line represents 1/24th of a full circle, or one hour of time, before or after solar noon. Notice that on the equinoxes, the sun always rises and sets six hours before or after noon, no matter which latitude you live in (unless you live inside the Arctic Circle). For any latitude, you can estimate how many hours of sunshine you have in summer and winter by counting the hour lines along the summer and winter arcs.
The bottom edge of the dome represents the horizon. More precisely, it represents the astronomical horizon — an imaginary circle, perfectly horizontal, with you in the center. All horizontal lines point outwards towards this imaginary perfect horizon. The outer perimeter of the circular observatory base represents the same horizon. (Your “personal” or visual horizon, where the sky meets the land, will obviously vary from place to place, and unless you are sailing on the ocean it will include hills and trees and other clutter. “Official” times of sunrise, sunset, moonrise, moonset, and so on always indicate the time when the sun or moon crosses the imaginary astronomical horizon. They wouldn't make much sense otherwise.)
You may find it interesting to compare the heights of the summer and winter arcs. Unless you live near the equator, the sun is higher for most of a summer day than it ever is at any time on a winter day. My students always seemed to be impressed by that — I had one especially happy moment when one of my students noticed that curious fact on her own while playing with her sky-dome.
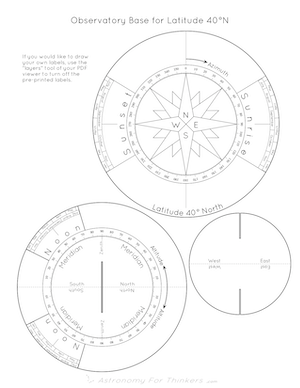
The Base
To assemble the base, cut out all three circles, then score and fold the smaller two along the dotted fold line. These two will form the upright portions of the base, while the larger piece with the compass rose will represent the “ground.” Form the two folded uprights into semicircles by taping or gluing the two sides together. Gluing will probably produce a nicer-looking result, but I strongly recommend laying a heavy book on them while the glue dries. Otherwise, they will probably warp, and warped uprights just don't look as nice as crisp flat semicircles. If you are after a truly precise look, you may want to leave some excess around the perimeter when you cut them out, then perform some precision trimming around the edge of the semicircle after you have glued the halves together. Finally, cut the two slots in their respective pieces, and slide them together.

The larger of the two semicircles represents the “meridian” — the vertical north-south plane, or the plane that contains the observer, the zenith, and the celestial poles. Whenever something crosses this plane, it is at the high point of its arc, and it is exactly halfway between rising and setting. (Circumpolar stars would be an exception, since those never set. A circumpolar star crosses the meridian at both the high and low points of its circle.) When the sun crosses the meridian, it is exactly noon.
Two measurements are required to name precisely where things are in the sky: “How high,” and “How far around.” The “ruler” around the compass rose represents “astronomical azimuth” — the measure of direction around the horizon, measured clockwise from north in degrees. The ruler along the meridian represents “altitude”, the measure of how high things are in the sky, measured vertically upward from the (astronomical) horizon.
Along the eastern and western sides of the base are the “horizon calendars.” If you were to mark the position of the sunrise and sunset along the horizon in various months of the year, as many ancient cultures did, you would have a horizon calendar like this.
I imagine that children might enjoy drawing their own labels, and teachers might find that it makes for an educational activity, so I have included many of them in an “optional” layer. To turn those off, find the “Layers” tool in your PDF reader, and deselect “Labels”. I have kept the degree markings and the month names as part of the permanent background, because I assume most people would find those tedious to label on their own.