
Printable Planispheres
Maps of outer space for kids to draw on, cut out, assemble, and use as constellation calendars.
If you imagine all of the constellations in the sky together as a single sphere, if you imagine the entire tapestry of stars as a unified spherical map surrounding us and sign-posting our view of the universe in every direction, then you will be visualizing a celestial sphere. A globe of the earth maps out the surface of the world we live on, and a celestial sphere is a globe of outer space mapping out the universe around us.
A Celestial Disk
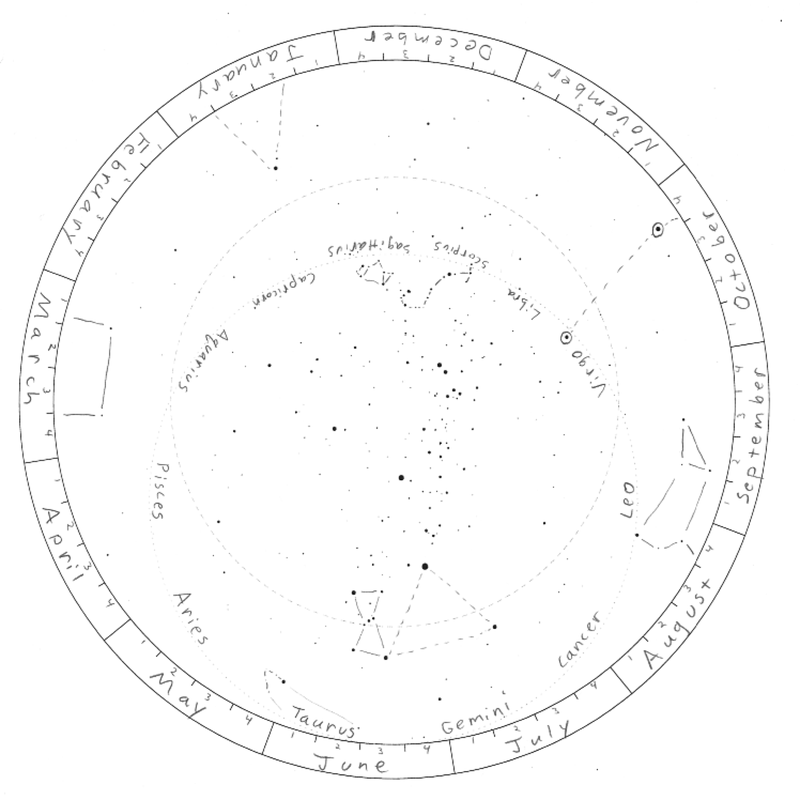
What if we wanted a flat version of a celestial sphere, for some reason? One way to make a flat ‘map of outer space’ would be to cut the celestial sphere into two halves, press both hemispheres flat, and print the two flattened hemispheres on opposite sides of a disk. We would then have the whole celestial globe in the form of a flat double-sided disk. We would have a sphere in the shape of a plane — i.e. a planisphere. If we slice the sphere in half along the “Equator of Stars”, then the “North Pole of Stars” will be centered on one side, the “South Pole of Stars” will be centered on the other side, the equator will circle the perimeter on both sides of the disk, and we can mimic the rotation of the stars in the sky simply by spinning the disk.
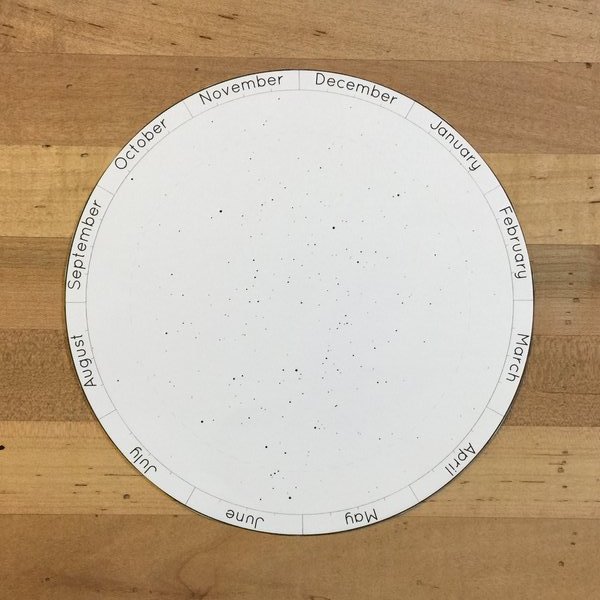
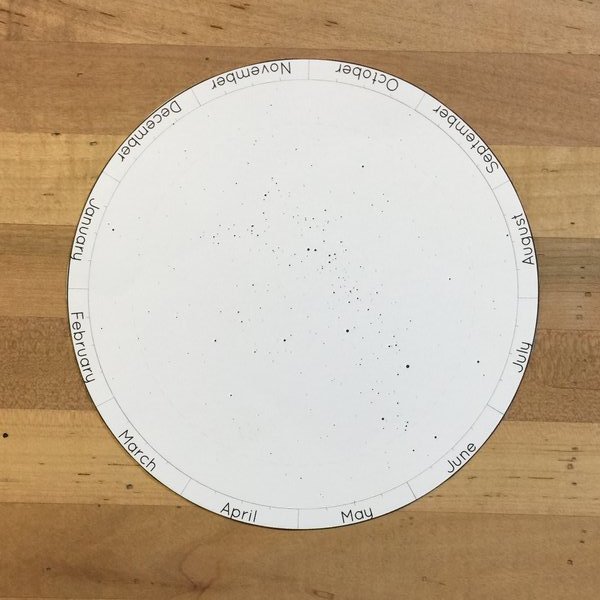
(Unfortunately, if we were to cut the celestial sphere in half exactly at the celestial equator, we would have to cut Orion in half at the waist. When presenting separate hemispheres, it is usually helpful to extend both sides of the map a little beyond the equator and into the opposite hemisphere, thus creating an overlap region on both sides. This is what I have done in the celestial disks shown here. It may not be visible in the photos, but there is a faint dashed line inset a little bit from the edges, and that is the equator, not the outermost circumference of the map.)
A Celestial Calendar
At any given time, one half of the celestial sphere is “up”, above us in the sky. And one half of the celestial sphere is always “down”, hidden from us by the earth below the horizon. Is there a way to use a celestial disk to show which half of the universe we can see at any given time?
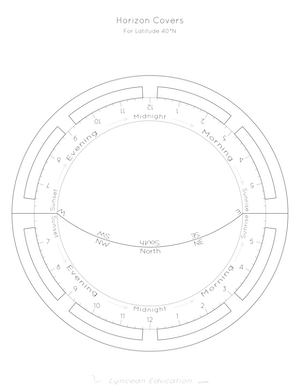
If we prepare a semicircular slipcover for a celestial disk, the cover can hide half of the stars, and reveal the other half. But in the sky, we see different stars depending on what date and time we look, and on the latitude where we live. So we need to cover different parts of our celestial disk at different times, and adjust the covering for different latitudes of the earth. We can solve the second problem by shaping the cover appropriately to match our latitude, and then we can solve the first by adding clock and calendar markings, and rotating the disk to match the appropriate time.
If we live in the northern hemisphere, we need to leave the center of the northern side of the celestial disk exposed. There are stars close to the North Star that turn forever in counter-clockwise circles in the northern sky, and that never set. These are always up, so our cover for the northern hemisphere of stars needs to leave the central portion of the disk exposed, no matter which way we turn the disk. On the other hand, the cover for the southern side needs to permanently hide the central portion of stars — those stars which residents of the northern hemisphere never get to see, because they never rise above the southern horizon.
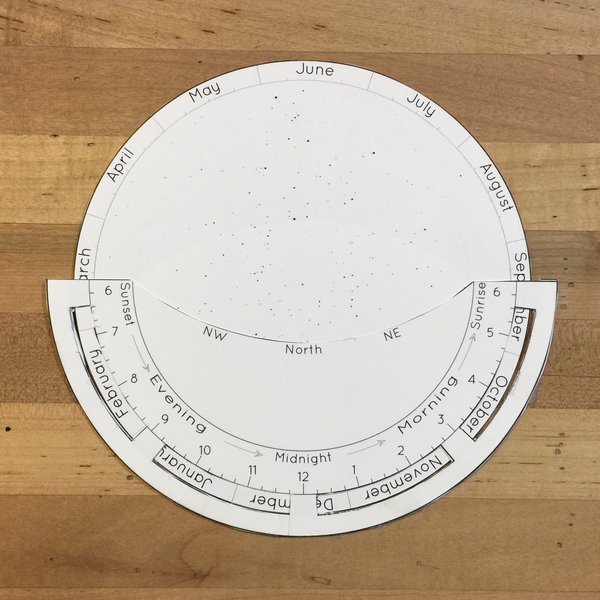
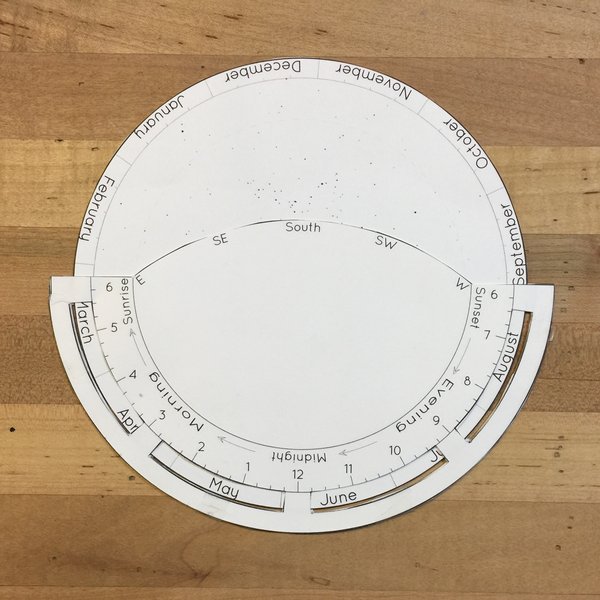
Now if we rotate a particular date on the wheel to line up with a particular time of day on the cover, the planisphere will show what the sky looks like at that date and time. In the ‘window’ above the northern horizon of the sleeve, we will have a picture of what the northern sky looks like, and above the horizon of the southern side of the cover, we have a picture of what the southern sky looks like. (The eastern and western portions of the sky are represented near the left and right sides of the planisphere, and the sky overhead is shown in the open space far above the northern horizon.)
Single-Sided vs Double-Sided Planispheres
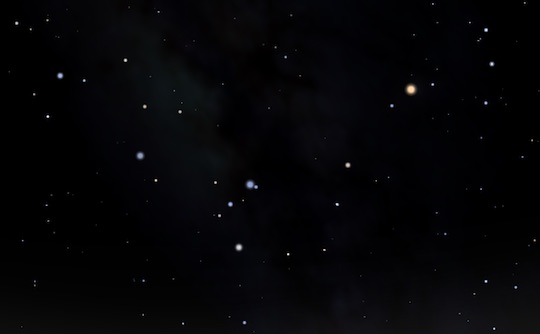
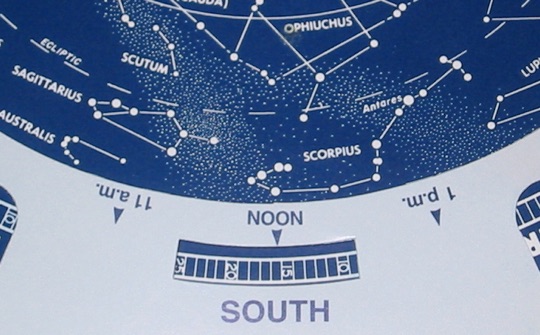
A common astronomy toy sold by science education companies and available in many museum gift shops is a ‘planisphere’, or ‘star wheel’, similar to mine. When I first started teaching astronomy many years ago, there were a number of options available, but many of them were single-sided. They were intended for viewers in the northern hemisphere, and showed only the stars visible from the northern hemisphere on a single disk, and they covered this disk with an oval window. These single-sided planispheres tried to represent the entire dome of the sky within one oval on the map, and had several drawbacks. For one thing, trying to hold the map upside-down over your head, with the correct corner facing north, and trying to match up the pictures with the real constellations while your head is in this position, was inconvenient. For another thing, the constellations along the outer edge of the dial, the ones near the ‘southern horizon’, were highly stretched and distorted. This is an unavoidable consequence of trying to draw a flat picture of a round thing, but it was especially bad in these single-sided planispheres that tried to include too many southern constellations on a northern map. As an example, compare the appearance of Scorpius and Sagittarius in reality with their appearance on an old planisphere:
However, in the last decade or so, these inferior single-sided planispheres have apparently disappeared in favor of David Chandler’s Night Sky. Whenever I visit a museum gift shop or search online, this is the planisphere that I usually find. It’s a double-sided planisphere, like mine, and instead of trying to show the entire sky at once, it shows the northern sky and the southern sky separately on reverse sides. Instead of awkwardly holding it straight over your head, you hold up the northern side in front of you and face north, or hold up the southern side and face south. The northern side of the double-sided planisphere is much like a single-sided planisphere with the outer edges trimmed back, and because it doesn’t try to reach so far into the southern sky, the constellations near the edge are less distorted. And the southern side of the double-sided planisphere gives you views of the southern sky in a far more natural, far less distorted, and far more comfortable way than the single-sided planisphere can.
If I wanted a planisphere for practical outdoor use, I would probably buy one of David Chandler’s dials. But as a teacher I wanted to make a blank version that I could print out onto card stock with a computer printer, and then have students label and assemble on their own. I wanted students to become more familiar with identifying stars and using planispheres by making their own personalized planispheres. One day I stumbled across a wonderful design by Toshimi Taki and decided to make my own version of it.
This design, with the ‘celestial sphere’ and slipcover as separate pieces, may not be the best for professional outdoor use by astronomers, but I think it is wonderful for teaching purposes. The removable double-sided disk provides a nice model of the celestial sphere, a disk representing a map of all of outer space. And if you want to take out the star disk and doodle your own labels on it, you can. Unlike single-sided versions, this one includes all stars and constellations. (David Chandler’s double-sided version does also, you just have to lift up the cover and look underneath to see the hidden ones.) The slip cover nicely models the earth ... or rather the horizon at any particular latitude on earth, blocking our view of half of the celestial sphere. The time-of-year markings on the star wheel measure the passage of the sun through the stars, and the time-of-day markings on the horizon cover measure the passage of the sun above and below the horizon. Being able to make it yourself and to draw on it yourself can be a fun educational project. Being able to write your own time markings on the cover also means that, if you are unfortunate to live somewhere where clock time and solar time are very different, you can just shift all your time labels to whatever you need them to be. And if you move to a different city, all you have to do is replace the slipcover with one representing your new latitude.
Making the Paper Planisphere
In the downloads section you will find a series of designs for printable double-sided planispheres that you can make yourself, for latitudes ranging from 60°S to 60°N. When I first started teaching, I liked giving students blank versions, and having them fill in the clock, calendar, and horizon labels themselves. Filling in your own labels can be a valuable educational activity, and I think my students enjoyed it. It also allows you to shift the clock labels if you live in a strange time zone. But it is also time-consuming, and it isn't really crucial. If you want to draw your own labels, there are also blank versions of the planisphere, ranging from the equator to a latitude of 60°, in the downloads section.
Choose the version closest to your own latitude.
They include both blank and labeled versions, in case you want to draw your own labels. (This is a good educational activity, and you might find it fun. You can't label them correctly unless you really understand what is going on, and You can use colors, and add whatever other decorations you wish.)

Printing the Templates
Start by choosing the latitude closest to you, and then print the corresponding PDF file onto card stock. You can use normal typing paper if you wish, but I think you'll find it makes a rather flimsy and floppy planisphere.
The first two pages contain the opposing sides of the celestial disk. I tried to align the two celestial hemispheres within the rectangular page so that you could use the ‘double-sided’ option of modern printers to print them automatically on opposite sides of the same page, but I find that sometimes printers have tiny asymmetric gutters that cause the two sides to not line up well. You can try double-sided printing if you wish, but you'll probably prefer to print the celestial hemispheres separately, and after you’ve labeled them and cut them out, you'll need to line them up and glue them back-to-back manually.
Drawing the Constellations
It may be fun to print off several copies of the dial and have kids make up their own constellations, and it may be fun to consult a star atlas and try to find as many constellations as you can on the star map. But if your map is to be a useful sky guide, a basic overview of which constellations are up at which time, then I recommend simply highlighting the brightest stars and constellations, the ones that make the useful visual landmarks in the sky. If you are familiar with the zodiac, you can label that as well, but that is not essential to the function of the planisphere. The zodiac is mainly helpful if you want to hunt for planets among the constellations.

What if you aren't familiar with the constellations? Perhaps my Constellation Worksheets will help, and there's also my new Constellations Course...
Cutting Out the Parts
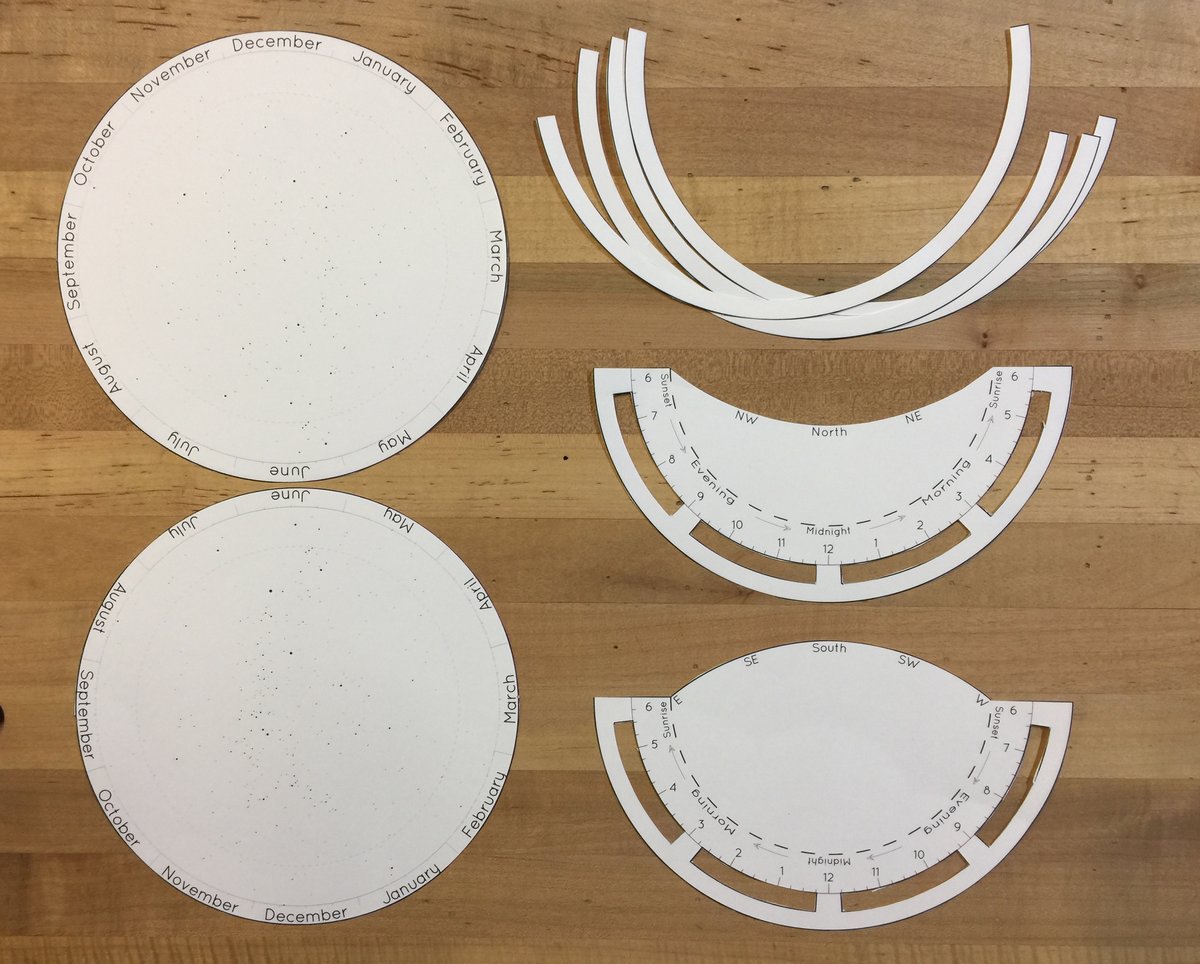
The first two pages in each file contain the two sides of the celestial disk, surrounded by a pair of spacers which will be used to separate the two sides of the cover. You will need to cut out the larger circle, then separate the two semi-circular spacers from the smaller circle. The third page contains the two sides of the slipcover. You will need to cut out the circle, cut across the middle to separate the two halves, and then cut out the windows using either a scissors or a hobby knife. You should end up with a collection of parts that looks something like this:
Assembling the Pieces
Assuming you have printed the two sides of the celestial disk separately, you will need to glue them back-to-back. If you want to be able to set your planisphere to a certain date and time on one side, and have it automatically set itself to the same date and time on the opposite side, then you will need to be sure to align all of the months with each other when you glue the two sides together.
To assemble the cover, you will need to glue the two opposite sides of the cover back-to-back, with a couple of spacers between them to leave room for the disk. It isn't really crucial how many spacers you use, but I suggest making the thickness the same as that of the dial — If the dial is two paper-thicknesses thick, then use two spacers. Gluing more spacers will probably be messier, and may or may not help the disk to rotate more smoothly inside the cover without sticking.
Once the disk and the sleeve are prepared, all you have to do it slide the disk into the sleeve. Remember, however, that both the disk and the cover have a north and south side, and that it is possible to put the disk in backwards. The northern side of the star map — the one with the Big Dipper, Cassiopeia, and the North Star in the center — needs to go behind the northern side of the horizon. The southern side of the star map — the one with Scorpius, Sagittarius, and a bunch of unfamiliar stars in the middle — needs to go behind the southern side of the horizon.
Engraved Planispheres
Using a computer-controlled laser engraving machine is not totally dissimilar to using a computer printer. When I started playing around with a laser engraver, I wondered if I could adapt my planisphere design to make wooden or plastic versions. The "Maker Space“ (community workshop) where I do my work hosted an online ”Maker Faire" (public show-and-tell) a while ago, and I made this video to present my attempts to make non-paper planispheres: