Smelting Metals with a Kiln
Simple metallurgy experiments you can do if you have access to a kiln.
Learning how to control fire enabled us to develop the invaluable art of cooking, which is an irreplaceable contribution to everyone's life to this day. It also enabled us to develop the science of chemistry. Heat enables cooking — of food and of substances.
If you wish to experiment with the transformation of materials, a kiln can be an invaluable tool. They range quite a bit in size, maximum temperature, and power requirements, but even a small one will enable you to perform a variety of activities involving pottery, glass, minerals, and metals. Many years ago, my school bought a small kiln for a bit over $300. It was quite small, which meant we couldn't fire large objects, or many objects simultaneously, but it also meant that we could power it with a normal wall outlet, and we could use it indoors in a large well-ventilated room.
If you'd like to buy your own tabletop kiln, Amazon has some for sale. If you can't afford a kiln of your own, perhaps your school's art department has one, or perhaps you can find a local college art department or a pottery studio willing to let you use theirs. The homeschooling-ideas website also presents several interesting homemade alternatives to kilns.
The Weathering of Metals
What happens if we just put plain metals in the kiln, and bake them until they glow? Liquids will evaporate when they get too hot, and organic substances will burn. What about metals? The following picture shows what pennies, nickels, and dimes looked like after I baked them to about 2000°F. They all deteriorated and formed a sort of flaky crust — black or dark gray in the case of the copper pennies, grayish or greenish in the case of the nickels, and grayish in the case of the dimes. (Nickels and dimes are a combination of nickel and copper.) In a separate test, I also tried steel, in the form of paperclips and steel wool, and the same thing happened — the paperclips turned into a black and brittle material, and the former steel wool crumbled into black dust in my hands. In all of these examples, the extreme heat turned the metals into something very un-metal-like, something brittle and crumbly and easily turned into powder. We call one of these powdery, formerly-metal substances a calx. (It rhymes with talc. To a modern chemist, these rust-like, corrupted substances are all examples of oxides.)
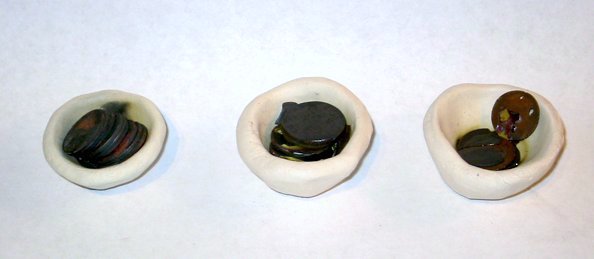
(Cautionary note: Please exercise care and common sense when putting metals in a kiln. Most importantly, NEVER PUT LEAD IN A KILN! The calx of lead is highly toxic, by inhalation as well as by ingestion. So never put fishing weights or lead shot or anything else made of lead into your kiln. Mercury oxide is also extremely toxic, but I don't think anyone sane would be tempted to put mercury into a kiln. Apart from lead and mercury, putting metals into a kiln should generally be a reasonable thing to do, but you still need to use some common sense. Keep the kiln in a large well-ventilated room, or better yet a garage or an outdoor shed, and avoid touching or inhaling anything unfamiliar. And bear in mind that a kiln in operation is much, much hotter than a kitchen oven, and needs to be treated with due respect.)
The bowls in the picture above were homemade, using clay from the pottery supply store, dried and baked to about 1900°F. You could just as easily use the clay trays that go under clay flower pots, as long as they are undecorated and you remove the price sticker.
Also note that the pennies were pre-1982 pure copper pennies. In the early 80s, the copper in pennies became worth more than one cent, and a penny's worth of currency couldn't even buy the copper in one penny. So the U.S. Mint started making pennies out of cheaper zinc, and coating them with copper to make them look like copper. Apparently 1982 was a transitional year, and all pennies dated 1983 or later are composed mostly of zinc. I recommend that you sort your pennies into old and new, and do not put any new zinc pennies in a kiln above about 1700°F, because this is what happens when you do:
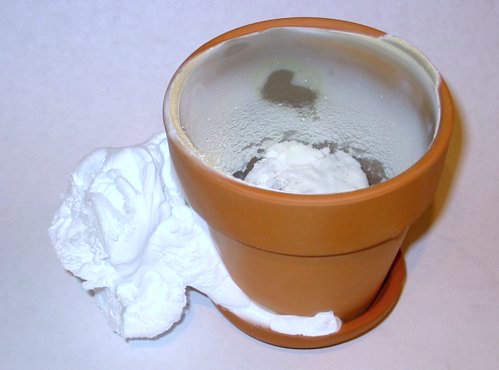
The zinc pennies, just like the other coins, turned into a calx, but in the case of zinc, the conversion is so rapid, vigorous, and total that the pennies end up as white powder all over the place. The picture above actually shows the second time that I tried putting zinc pennies in the kiln, in which case I placed the small bowl containing the pennies within a larger clay flower pot and a clay tray over the top as a lid. Apparently metal vapors seeped out the bottom and through the cracks and ended up condensing into cotton-candy-like billows of white fluff. This messy calcification of zinc would not by itself be a problem — the white calx is easily swept up or blown away. Unfortunately, there is apparently a yellowish form or mixture of the deteriorating zinc that is corrosive, and can dissolve firebrick. My school's kiln now has some minor pits and spots in the floor and on the interior walls, thanks to this. This is the reason I do not recommend putting post-1982 pennies in a kiln.
By the way, metals turn to calx whether or not they melt. Zinc and tin both have very low melting points as metals go, and will melt easily in the kiln (or a torch flame). You might be tempted to see if you could make a zinc or tin cast of something by melting zinc or tin in a kiln. If you try to puddle zinc or tin in a bowl in your kiln, they will both melt below 1000°F, but they will form a sort of corroded, contorted lump of crustified metal in the bottom of your tray or bowl. They calcinate and melt at the same time. (Tin is the main ingredient in lead-free “silver solder”, which you can buy at a hardware store.)
In any case, to return to the general process of calcination of metals, this process seems to be a universal degredation that befouls most metals. The only metals that do not calcinate when they are heated, or at least they are much harder to calcinate, are the “noble” metals — gold, silver, and platinum. Calcination is a general characteristic of the non-noble “base” metals. Another related characteristic of the base metals is that they degrade and turn to powder or crusty flakes when exposed to the weather. Iron and steel turn into a red or orange rust, while copper and bronze (sometimes used in roofs or statues) form an aqua-colored patina. This weathering does not happen to noble metals. In fact, this is one of the primary reasons that noble metals are so precious and valuable — they are incorruptible. All of the base metals are sooner or later corrupted into non-shiny, non-workable, comparatively useless materials. (A few man-made metals like brass and stainless steel can resist corrosion pretty well, but they still degrade eventually.)
What is going to happen to any base metals exposed in nature or buried underground? Sooner or later, air, water, and heat, acting alone or in combination, are going to turn all metals into very un-metallic minerals. This explains why we almost never find raw metals in nature. There are only a few kinds of metals that we can find pure and metallic in nature (mostly noble metals, and maybe sometimes a little copper, called native copper). And even those few kinds of metal that we can find raw are pretty rare. So where do we get the vast quantities of metal that our civilization relies upon to make strong, beautiful, and durable things? And where do we get those special metals, like aluminum, that don't even exist in nature?
The Un-Weathering of Metals
The answer is that we un-corrupt them. We find them in nature in their calcinated, rusted, corroded, degraded, un-metallic form, and we resurrect them. The picture below shows a polished mineral stone — an example of malachite. Technically it is a mixture of malachite (the green stuff) and tenorite (the black stuff). If you separate these two materials and grind them into powder, you end up with a green powder which curiously resembles copper patina, and a black powder which curiously resembles copper calx. (To a modern chemist, these two substances are copper carbonate and copper oxide.) And oddly enough, if you bake either one in a special way at around 2000°F, then like a phoenix from the weathered copper ashes, you get copper. We call this special process smelting. Malachite is an ore of copper, and you can smelt copper by baking ground malachite.
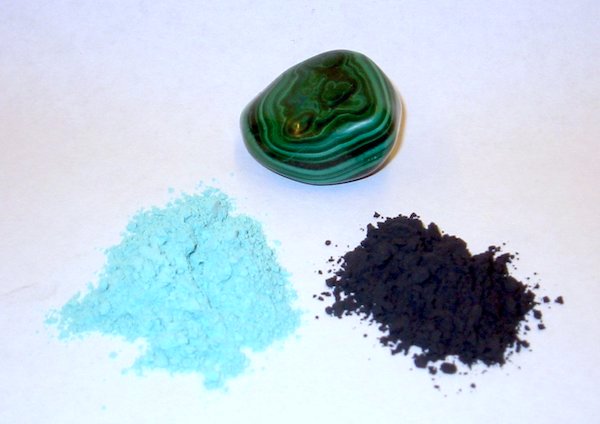
What is this “special way” of baking? How is it that baking the powder can do the opposite of baking the metal, and turn the powder back into the metal? How can baking turn metal into calx, and also turn calx back into metal? The difference is that we need another ingredient. Ancient people who discovered smelting by accident, and then performed it deliberately, always performed it deep within a fire or furnace, where there isn't much fresh air, and with plenty of charcoal around to keep the fire going. We'll have to create the same conditions if we want to reverse the calcination process in our kiln. We'll have to simulate a smelting furnace within the kiln.
(By the way, you don't actually have to buy mineral rocks and grind them into powder. You can buy many mineral calces from the pottery supply store using their modern chemical names. I found copper carbonate and copper oxide in the “glaze chemicals” section of my pottery supply store, and I successfully smelted copper from both of them ... although I think the copper carbonate worked a little better for some reason. Nowadays, you can also just order many chemicals online.)
Smelting in a Clay Pot
To smelt our powders back into metals, we need to bake our ore powder mixed with something combustible in a closed container. I tried putting seed corn and popsicle sticks in with the ore powder, thinking they would turn to charcoal in the kiln. The seed corn actually worked — it turned to charcoal in the kiln and reduced the ore to metal — but it created a lot of smoke in the kiln room while it was boiling off the volatile non-charcoal ingredients. (Actually it was kind of interesting to find charcoal in the shape of corn kernels afterwards.) The popsicle sticks made the entire school building smell like smoke, disappeared completely, and failed to yield any metal. It would be much less smoky to start with charcoal in the first place, but I didn't want to put “match lite” charcoal in the kiln, and I didn't want to deal with the mess of crushing the briquettes. The answer I found is aquarium filter charcoal — it doesn't contain any accelerants, and it comes in convenient pellets in convenient pourable containers. It is even “activated”, which means it is extremely porous, which may or may not improve the smelting process.
For the container, we need something that can withstand the temperatures of the kiln, and be sealed with a lid to keep out fresh air. You could make your own crucible from clay, but I find it is difficult to make a lid fit right. Clay pots from the garden supply store work perfectly — you can use the trays which are supposed to go underneath as lids. The only difficulty is that there is a drainage hole at the bottom of the pot. But you can plug this easily enough with a little clay. (I've been told that the automotive body filler “Bondo” would work perfectly for this — it dries in 5 minutes, it doesn't shrink when it dries as clay does, it can withstand kiln temperatures, and perhaps you could even sculpt a concave depression at the bottom to better collect the liquid metal. But I never got around to trying that suggestion.) Just to be on the safe side, you should place the pot on another tray to collect anything that leaks out the hole. As an alternative to clay pots, you could also buy unglazed ceramic bowls and unglazed tiles for lids at the pottery store, almost as cheaply as clay pots.
The whole smelting kit looks like this:
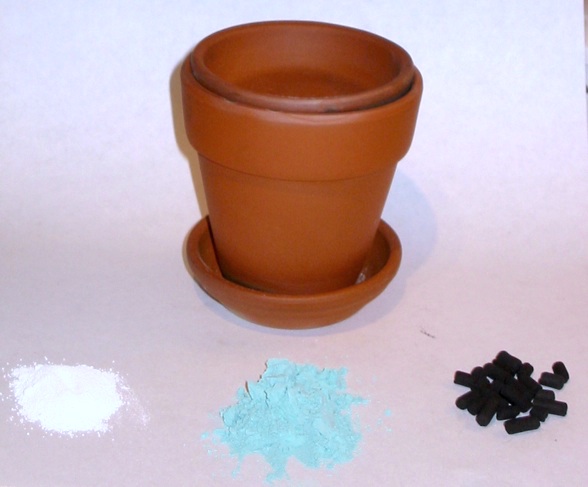
The black pellets are the charcoal, and the green powder is the copper carbonate. The white powder is “tin oxide”, a purified powdered form of the tin ore “cassitterite”, also available at the pottery supply store. You can smelt it separately to make tin, or you can mix a little bit — maybe one part in six — with copper ore to make bronze. (Bronze consists of lots of copper with a little tin. If you mix them the other way around, with lots of tin with a little copper, you make pewter.) In a clay pot with a plugged hole, mix the ore powders in the desired proportions. You can either stir the charcoal in to the powder or pour a layer on top of the powder. I suspect the latter does a better job with less charcoal, but I don't really know. For a first attempt, I would add about half as many spoonfuls of charcoal as you have ore powder — if you find lots of leftover charcoal, you can use less next time. With the ore powder and the charcoal in the pot, place one saucer on top as a lid, and another underneath as a spill catcher. You can try to seal the cracks with clay to make it airtight, but I haven't found that to be necessary, as long as you have plenty of charcoal inside. And anyway, I have no end of trouble trying to make an airtight clay seal that doesn't crack when it dries. You also have to allow some way for the ores to exhale their non-metallic part (i.e. for the “carbonate” portion to escape as carbon dioxide gas). All in all, I think it is best not to worry about sealing the pots, unless you get really good at smelting and pottery and you want to produce very clean ores as efficiently as possible. I just placed the lids squarely on top of the pots, and it worked fine.
With the powder and charcoal inside and the lid on top, place the crucible into the kiln and fire the kiln to 1950-2000°F. My kiln took about an hour to reach the intended temperature, and I usually baked the materials for another hour or two after that. If I opened the lid of the kiln a crack and listened closely, I sometimes noticed a bubbling sound near the end of the process. The was presumably the sound of the ores “exhaling” the non-metallic vapors, and the cessation of the bubbling noise seemed to be a pretty good indication that the smelting was done. I suspect that it only occurs with the carbonate ore, but I never did a thorough series of experiments to establish the nature of the bubbling for certain.
After waiting for everything to cool, break the pot if necessary, dispose of the leftover charcoal, and you will usually find small dots and globs of metal adhering to the walls, plus a few larger globs of metal on the bottom. Sometimes a large puddle will have gathered at the bottom of the pot, but not always. The following picture shows a sampling of metal that I have smelted from ore powder with aquarium charcoal in clay pots. From left to right, they are bronze, copper, and tin. I used a barbeque grill brush to clean the larger bits of copper and bronze, but the tin came out already bright and shiny, for some reason.
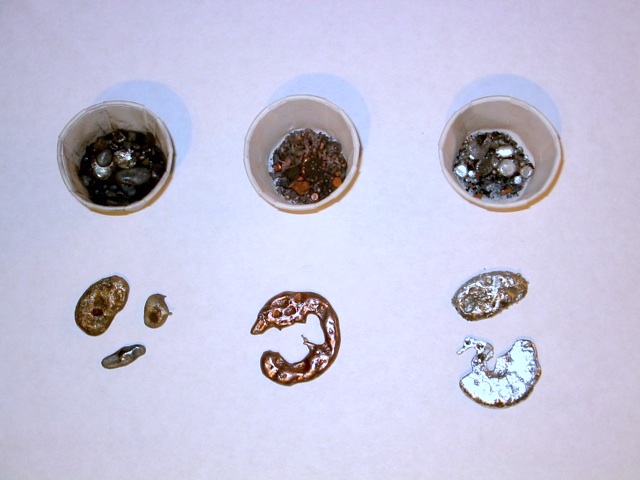
In modern chemical terms, here's a summary of what's going on: Extreme heat causes metals to combine with oxygen in the air to form the calx. To a chemist, a calx is an “oxide”. Natural weathering either causes the same thing, i.e. the combination with oxygen to form an oxide, or it causes the metal to combine with carbon dioxide in the air to form a “carbonate”. The natural patina that forms on copper and bronze is copper carbonate. Nearly all metal ores are oxides, carbonates, or sulfides (the combination of metal with sulfur). In extreme heat and fresh air, i.e. in a kiln or furnace with plenty of ventilation, metals all turn into oxides, and calces all remain or turn into oxides. In the case of carbonates, the heat drives off the carbon dioxide and substitutes oxygen, and in the case of sulfides, the heat drives off the sulfur and substitutes oxygen. In all cases, extreme heat and fresh air will leave you with an oxide. (You can try this yourself with the green copper carbonate — put some in a clay dish in a kiln, and it will turn into the black copper oxide.) The way to prevent or reverse the formation of the oxide and leave only metal is to cut off all fresh air, and supply the ore with carbon (charcoal) instead. The carbon will act like an “oxygen sponge” as it burns up and turns into carbon dioxide. In so doing, it will not only use up any fresh air that leaks in by burning, but it will also extract the oxygen from the ore, in effect “breathing out” the oxygen from the ore as it burns into carbon dioxide, and leaving pure metal behind.
Casting Metal
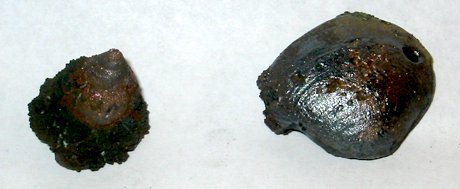
I tried re-melting my metals into molds to make pretty shapes out of them, but without much success. The problem is that you need to melt them without turning them back into calx. Again, you need to simulate the conditions of a fire by enclosing the metal and mold in a container, and smothering them with charcoal. Apparently, however, making an airtight seal becomes a much greater necessity this time, because my attempts produced more or less calcined metal, especially on the upper side, which was not protected by the walls of the mold, even though it was covered with charcoal. These two lumps of metal represent my attempts to mold a copper univalve seashell, and a bronze clamshell (notice the black copper calx around what was the upper end of the seashell):
If you wish to try, I suggest the following procedure: Make a mold by mixing equal parts Plaster of Paris (available at any home supply store) and silica (available at the pottery supply store), adding this powder to water until you make a paste, then using the paste to fill a small homemade ceramic bowl or a paper ketchup cup. While the plaster is still wet, press a shell (or whatever) into the plaster and leave it there. After the plaster dries, you should be able to gently nudge, twist, and wiggle the mold-forming object (known as the “pattern”) free without damaging the mold. If you used a paper ketchup cup as your mold container (or “flask”), peel it from the dried plaster so that it doesn't burn in the kiln. Now fill the mold with your nuggets of smelted metal, place it in a clay pot, smother it with charcoal, place it in the kiln with a lid on top and a tray underneath, and fire the kiln hot enough to melt the metal (around 2000°F for copper, a little less for bronze, 1000°F should be plenty for tin). After it cools, you should be able to crumble the plaster fairly easily, and with luck you'll be left with a metal casting in the shape of your pattern.
(You may find some interesting additional ideas on the subject of melting and casting metals, including backyard melting furnaces, at www.backyardmetalcasting.com.)