
A Toy Spring Scale
Make a crude weighing device from simple parts
You pick up different rocks, books, and other objects, and you feel that some are heavier than others. But how much heavier? How can you name in numbers the “heaviness” of each thing and compare them, as you can compare lengths with a ruler? Is there such a thing as a ruler for heaviness? Or in more scientific words, how do you measure weight?
One of the first tricks was to compare the heaviness of the thing you are interested in to the heaviness of something else that you can count. You put the thing you want to measure on one side of a balance beam, and then you count out counting units on the other side until the scale balances. For small weights, ancient cultures often measured weight by counting seeds, because they were regular in size, and readily available. This is where we get our modern units of “grain” and “carat.” (One grain of weight is approximately the weight of a wheat grain, and one carat of weight is approximately the weight of a carob seed.) For larger weights, there were no regular objects available as counting weights, so people had to make do with rocks. The modern “pound” and the British “stone” come from a long process of evolution in selecting exactly which rocks to use as the counting weights.
But no matter what you choose to count, you have to figure out a way of balancing one weight against another, of comparing the weight in question to the weight units you have chosen to count with. The most direct and obvious way is to put them on opposite sides of a balance — put the weight being measured on one side, add or subtract counting weights until the balance is level, and then count your counting weights. But this is obviously highly inconvenient. You have to carry around lots of equipment with you, and spend lots of time carefully adding and subtracting your counting weights...and you have to actually count them. If there are more than a couple of dozen seeds, that will be tedious, and you are likely to make an error. You also can't measure anything smaller than a single counting weight. It's a mess, and finding a better way to measure weight soon became a pressing need as civilization developed.
Practical Weight Measurement
Someone who understood leverage, possibly Archimedes, realized that you could make a more precise and hassle-free scale by replacing the counting weights and weighing pan with a single sliding weight on a lever arm. These “Roman Balances” or "Steelyards" appeared in elementary form at various stages in history, and became a well-developed tool in post-Archimedean Roman civilization. If you have two or three sliding weights of various sizes, you can measure a large range of weights with great precision, and to this day, many of our precision scales in chemistry laboratories and doctor's offices use the principle of the triple-beam balance.
But these are still not very practical for casual, everyday home use. They are heavy and clunky, hard to move around, and not that cheap. What kind of instrument can you use if you just want a quick measurement, and you don't need an answer to four decimal places? Bathroom scales, kitchen scales, luggage scales, postal scales...these are all compact, lightweight, self-contained instruments that can tell you the weight of something just by having a needle point to the right number on a number line. How do these handy weight-measurement devices work? You will probably have noticed that the weighing platform or weighing hook is always bouncy or springy. These cheap, portable “spring scales” all have a spring inside connected to a dial or a pointer on the front. The more weight you add, the more the weight stretches or compresses the spring, and the more this moves the needle along the dial. Then you just read the number that the needle points to...assuming that the people who made the device correctly matched the number marks to the weights on the spring. And even if they didn't, somethings springs stretch over time, or other things shift, and the device might need small adjustments to match the real, physical weight to the numbers on the number scale. The drawback of the handy spring design is that the scale requires calibration to be useful. They must be calibrated at the factory when they are manufactured, and possibly re-calibrated or “zeroed” once in awhile during use.
(Besides spring scales and triple-beam-balances, there are also modern, fully electronic scales, but those work on an entirely different principle. Well...not entirely different, come to think of it. They use internal strain gauges, which work like “electronic springs”. And like spring scales, they also require calibration.)
A Toy Spring Scale
You can demonstrate the principle of operation of such a spring scale by making one of your own from simple household items, using a rubber band as your spring. The idea here is that you hang weights on the paperclip hook, and this will stretch the rubber band at the top and pull the string down along the strip of paper.
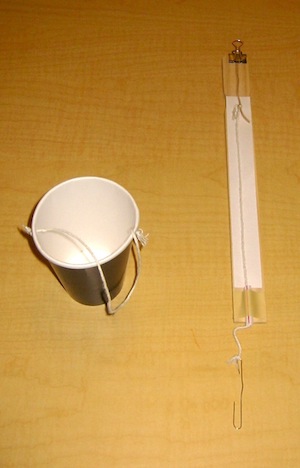
The cup is not really necessary, but is useful for weighing small objects that won't hang from the hook. For a pointer, we could probably glue an arrow of some kind on the string, or paint a brightly-colored dot near the top of the string. I chose to just use the knot between the rubber band and the string as the pointer.
You may have noticed a problem by this point. There are no markings on the scale. The paper is blank. We have to draw in the marks and the numbers...but how do we know where to put them? Children may suggest that we can use a ruler to draw the marks...but suppose we do this. What would the numbers tell us? We might hold up the scale empty, and it might point to an inch and a half. We might put a large eraser in the bucket, and then it might point to 3 inches. Everything would be messed up. It wouldn't make any sense. We need to make our marks stand for weights, not distances, and we need to make sure that the scale points to the right weight mark when that amount of weight is in the bucket. We have to do some work to make the pointer and the “weight ruler” line up properly. After we have assembled the parts, we need to calibrate the scale.
Assembly
The parts you will need are shown below. You can obtain paint-stirring sticks from your local hardware store. The paper isn't really necessary, but it makes the numberline look much nicer, and if you mess up, you can tear it off and start over with a new piece of paper. The masking tape isn't really necessary either — you could use scotch tape for everything.
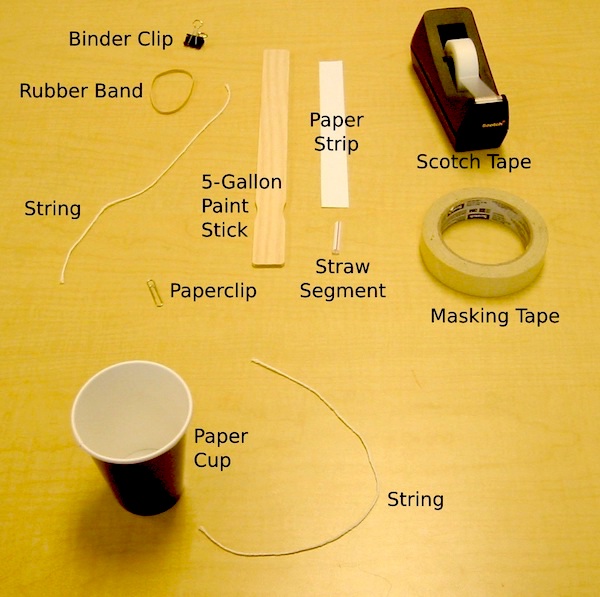
Start by taping the paper and the straw piece to the stick. A one-inch by 8½ inch strip of paper cut from the end of a regular piece of typing paper works fine. Tape it roughly in the middle of the stick, leaving space at both ends. Tape the straw segment to the lower end of the stick. (I think it looks nicer to use the unpainted side of the stick as the front, and to use the handle end of the paint stick as the upper end, but it really doesn't matter.)
The string assembly comes next. Cut a length of string slightly longer than the stick, and tie one end to an unbent paperclip. Tie the other end to a rubber band. I have used both #32 and #16 rubber bands cut in half, which were appropriate for things weighing roughly several ounces. Heavier things draw the rubber band too far out, and lighter things don't make it move enough to distinguish clearly. You can, of course, try lighter or heavier rubber bands, or double them up, as you wish. Whatever you choose, pass the rubber band backwards through the piece of straw, draw it up to the top, and fasten the far end of the rubber band to the top of the scale with a binder clip. Make sure to leave at least two inches or so of “working length” in the rubber band, between the binder clip and the knot, or the motion of the string will be too restricted.
For the bucket, just poke holes in the top of a paper cup, and tie the ends of a string on opposite sides.
Calibration
Now for the fun part. You need to pick something to use as your counting weights, drop them in the bucket one by one, and draw marks and numbers alongside the pointer each time to record the position for each amount of weight. Corn grains or dried beans will be much too light. If you used a long length of the weakest rubber band you could find, lead shot might work. I discovered that the large rectangular erasers that our students use, new and in the wrapper, weigh almost exactly one ounce, so I had my younger students use those. They would hold up the scale empty, draw a mark next to the pointer, and label it “0”. They would place one eraser in the cup, draw a mark next to the pointer, and label it “1 oz”. And so forth.
If you have a set of standard weights, you could of course use those to calibrate your spring scale. If you have measuring containers for measuring milliliters of water, you could also calibrate your scale in grams, since one gram is the weight of one ml of water. Have the students pour 50 ml of water into the cup, draw a mark, and label it “50 g”. With 100 ml of water in the cup, draw a mark, and label it “100 g”. And so forth. I had my older students do their calibration with water, and then place weights from a standard brass weight set in their cups to see how close they came.
The rubber bands do sag a bit with usage, so you may want to have the students play with the scales for awhile before calibration, to help “break in” the rubber band. You may also want to warn them not to overstretch or abuse the rubber band after they have calibrated their scale. If the rubber band does sag a little, you can correct it to some extent by tucking a little bit more of the rubber band under the binder clip. Moving the rubber band's anchor point is a quick way to “zero” your toy spring scale. If you switch the rubber band to make a spring scale for larger or smaller weights, you will of course have to re-calibrate the scale.