
A Homemade Air Cannon
Make your own "air blaster" that shoots bullets of air, see what the air bullets look like, and study how they work.
Maybe you've seen “air blasters” in the toy store. They look like buckets with a hole in the end, and they are supposed to shoot big puffs of air at things. If you make your own instead of buying one, then you can experiment with your own puffing machine and see if you can figure out how it works. You can even make the “air bullets” visible, so you can see what they look like. I'll show you how to make a small “air gun” with a paper cup and a balloon, and you can figure out how to make a bigger one if you want to, perhaps from a large bucket and a plastic garbage bag.
A Paper-Cup Air Gun
The supplies for this are very simple: a paper cup and a balloon. If you don't have any at home, you can buy both of these things in the “party supply” section of your local store. You could also use plastic cups instead of paper, but you have to cut a hole in the bottom, and this will probably be easier with paper than with plastic. You can use any size cup that you want to, but your balloon needs to fit over the mouth of your cup. A “normal” paper cup (not a large tumbler and not a small sipping cup) works fairly well together with a standard 12" balloon.
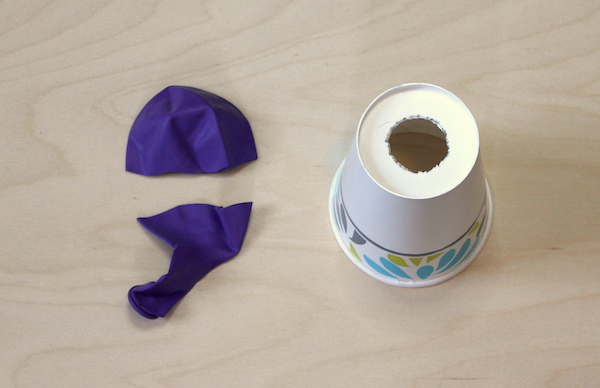
To make the opening or the “nozzle” of your air gun, you need to cut a hole in the bottom of the cup. The exact size of the hole in the cup isn't critical, but it should be roughly half of the diameter of the bottom of the cup. For a “normal” medium-sized paper cup, tracing around a quarter-dollar coin works pretty well. (How much does the size of the hole matter? Come to think of it, do you suppose the shape matters? Could you make “air bullets” with different sizes and shapes if you had holes with different sizes and shapes?)
To make the “trigger” or “hammer” of your gun, you need to stretch some fabric over the mouth of the cup. That's what the balloon is for. Cut off the top half or two-thirds of the balloon, and gently try to stretch it over the opening. Paper cups can be pretty flimsy, and trying to stretch the balloon over the mouth of the paper cup without crushing the cup can be frustrating. You may want to nest the cup inside two or three additional cups to help it hold its shape, and stretch the balloon over all of them. Then you can gently slide the extra cups off from underneath the balloon. I think it also helps to leave a slight taper to the balloon to help grip the cup, which is why I recommend cutting off a little more than a hemisphere of the balloon. After you've stretched the balloon over the mouth of the cup, it should look something like this:
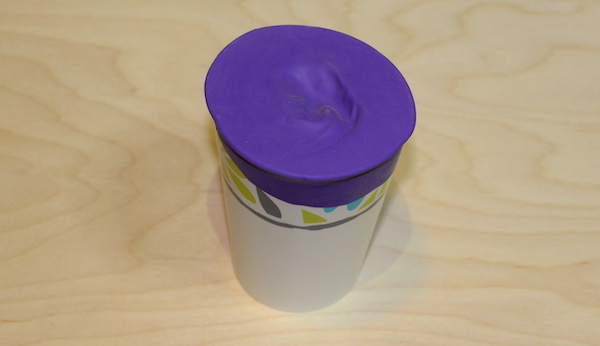
Once your “gun” is assembled, just point it at something, pinch the fabric of the balloon, pull it back gently, and let it snap back into place. (If it is too hard to get a grip on the smooth fabric of the balloon, try gently squeezing the mouth of the cup to flatten it a little bit. This should cause the fabric to pucker and give you something you grab ahold of. Just don't squeeze too hard or the balloon fabric will probably pop off.) Can you ruffle water, or make someone's hair move, from several feet away? Can you use your air gun to blow out a candle? What if you sprayed some perfume or air freshener inside your cup? Could you make a “smell bullet”?
What Does an "Air Bullet" Look Like?
How big are the “air bullets”? What shape are they? How fast do they move? How far can they go? Sometimes you don't see anything happen when you fire your gun — Does that mean that the bullet veered off course? Why are these questions so hard to answer?
The main reason that air bullets are hard to study and to learn about is because you can't see them. You have no idea where they are until they hit something and cause it to move. It would really help if we could see the air itself, and see how it is moving. Scientists and engineers have this same problem. When you want to learn about how air or water moves, it can be tricky, because you can't see air or water. (Well, you can see droplets of water, and you can see the surface of a pond, but you can't usually tell what is going on underwater. You can't see how the water itself is moving on the inside, because the water itself is usually clear.)
Sometimes you can see swirls of smoke in air, or swirls or puffs of motion in muddy water. If it is really cold outside, you might be able to see your breath, because the cold causes mist to form in your breath. Sometimes you can tell how the atmosphere is moving by watching clouds. In all of these cases, we can tell how air or water is moving, because something else is there, moving with the air or water, and the something else is something we can actually see. Does this give you any ideas? Scientists and engineers will often try to see how air or water is moving by adding something to it that we can see, and they have developed an entire art of flow visualization. It's a fascinating and beautiful art.
Now what about our air gun? If you light a match and then blow it out, it will smoke for a while. Could we throw a match into our paper cup and use the smoke to see the air bullets? At Halloween, we sometimes use dry ice to make fog or smoke effects. Could we put some dry ice into our paper cup? Sometimes you can buy foggers at the pet store, to keep your lizard tank humid. Could we try pumping some fog into our paper cup?
At this point, you might begin to think that we should have used a plastic cup instead of a paper one. But even if you had used a plastic cup, and you put some kind of smoke or mist into your cup, and you actually saw the bullets coming from your “air gun,” I think you would probably find that the bullets move much too fast. They zoom by, and they don't let you get a good look at them.
So we have two issues to deal with here: We need to find a way to visualize the air bullets that doesn't burn our paper cup or make it soggy, and we need to find a way to make slower bullets.
One way to make slower, gentler air bullets might be just to gently tap on the balloon instead of pinching it and making it snap. If you try this, the “bullets” probably won't do much when they hit things, because they are pretty weak. But after we figure out how to visualize the bullets, maybe we'll at least be able to get a good look at them as they slowly drift by. Another way to make slow air bullets is to set aside your “air gun” for a minute, and make a new puffing machine. You don't really even need to make anything this time. Just find a plastic bottle. An empty water bottle will be perfect. If you give the bottle a quick squeeze, it will puff. Again, these puffs won't be as powerful or as fun to shoot, and we should still be careful about what we put inside, because plastic can melt. But it is quick and easy to make gentle puffs with a bottle, and they're great for playing with gentle air bullets.
Now, how can we visualize the air bullets? Try lighting a match, blowing it out, and tossing it into the bottle before you squeeze the bottle. You maybe be able to see what the “air bullet” looks like if you do this. If you happen to have any incense sticks lying around, those work fantastically. They are like smoke-makers on a stick. (You can buy a bunch of incense sticks at your local home goods store for a dollar or two.) Just light one, blow out the flame, and hold it inside your plastic bottle or your air-gun for a few moments. Your bottle or gun will fill with smoke, and then you can remove the incense stick and make a puff. What do you see?
The “air bullets” are slower now, but they are still a little tricky to photograph. This is a puff that I managed to make with a plastic bottle and an incense stick:
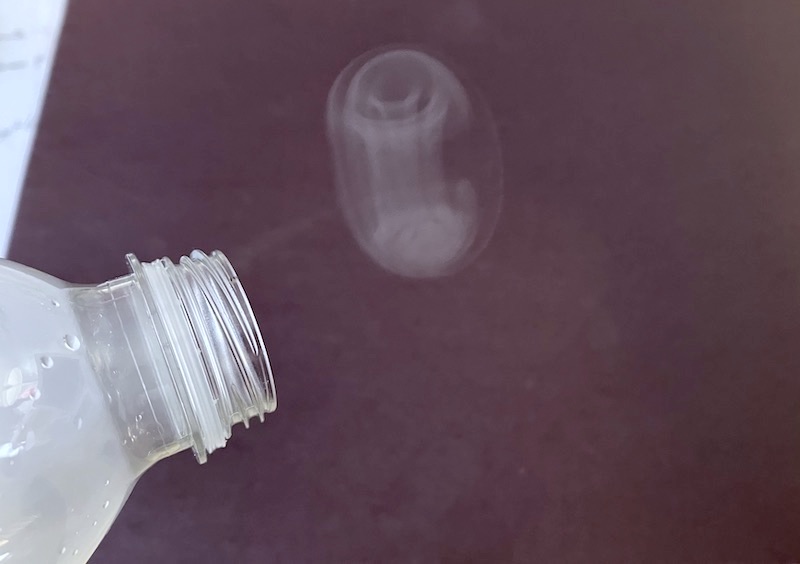
Depending on how you squeeze the bottle, you can probably make quite a variety of “bullets.” Sometimes they disintegrate right away, but sometimes you can see beautiful “bullets” being fired from your “gun.” And the best bullets always have the same shape. They're donuts!
The “air bullets” from an “air cannon” are rings of air. And if you pay close attention, you'll notice that they are spinning as they travel. If you can get a clear view of one, it's fascinating to watch. They are a little like miniature tornados, except each tornado has been rolled into a ring, so that the ends come together. (If you examine my photo carefully, you may notice several “layers” inside the spinning donut-shaped tornado. The smoke is not evenly spread, and the thicker parts got wrapped into several swirls of the spinning ring.) We call tornado-like swirls “vortices” (one vortex, two vortices), and when you roll them into a ring we call them "vortex rings.“ If we want some fancy names, the official name for ”donut shape“ is ”torus", and another name for a “vortex ring” is a “toroidal vortex.”
(If you tried experimenting by making holes in your cup with different shapes, you probably found out that round holes work the best. Do you see why this is? If the “ring vortex” had corners, it wouldn't be able to roll very well. But I'll admit I've never actually tried different shapes myself. Maybe you'll discover something surprising.)
Can you think of other examples of vortex rings in nature, or in civilization? Keep your eyes open, and you'll probably notice them from time to time.
Half Vortex Rings
I'm going to mention one special and fascinating example of another vortex ring that you can make, and visualize, and watch closely. You can make a very long-lasting and slow-moving vortex ring in your pool simply by swishing a plate or saucer or disk of some kind gently across the surface of the water. Actually, this makes HALF of a vortex ring. It makes a semi-circular or semi-toroidal vortex, with the two ends of the semicircle stuck to the surface of the pool. In sunshine, you can seem them easily by their shadows on the bottom of the pool. You can also pour a little food coloring into one of the ends and it will give you a very nice view of the 3D vortex, just like the smoke in the air cannon.
I tried recording my own videos of this phenomenon in a pool, but I'm not even going to publish my videos here, because they are nowhere near as good as those of youTuber “Physics Girl.” (I didn't even know about these half-vortex-rings until I saw her videos.) Her original video explaining the phenomena is here, and she does some additional experiments here. (If you don't have a large pool handy, presumably you could also create these vortices in a small “kiddie pool,” or maybe even a bathtub. You'd just need to make a smaller ring using a smaller saucer. And if you don't have sunshine, you probably won't be able to see them by way of their shadows, so you'll definitely need some food coloring.)