
Taking Pictures of the Sun
How to make beautiful time-lapse photographs of a sunrise, and what you can learn from them.
As I used to say to students: “Wouldn’t it be fun if we could reach out with a gigantic marker, and draw on the sky, and trace the paths of the sun and moon and stars? Wouldn’t it be cool if we could see a recording of trails on the sky showing where everything came from and where it all goes? Well … if we can’t do that, what could we do?” One thing we can do in the modern world — almost as good as drawing on the sky — is to make time-lapse photographs of things moving across the sky.
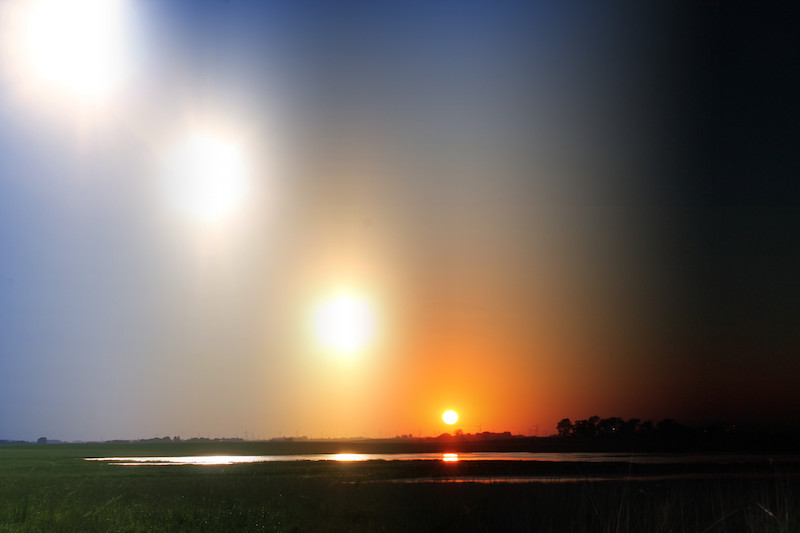
Every object in the sky, however, presents its own unique challenges to photographers. You can't just “point-and-shoot,” because the unusual lighting will confuse your camera, and keep it from working properly. If you try to photograph stars, you will probably record nothing but black sky. In the case of the sun, the sheer overpowering brilliance means that, unless you do something special, it will be extremely overexposed in your photograph. All you can see, with your eyes or with a camera, is just a big puddle of glare. You may still find it fun to experiment with taking photographs of the sun like this, however, especially if you can blend several photos into a time-lapse. For example, this is a composite of several photos I took of a sunset over a pond:
However, if you want to get a good look at the size and shape of the body of the sun itself, you will need help to get rid of the glare. Normal sunglasses are nowhere near good enough, but you can buy very inexpensive “eclipse glasses.” These are in effect super sunglasses," and they cut down the light levels dramatically, eliminating the glare, and letting you get a good look at the size and shape of the sun itself. They are sold mainly for watching solar eclipses, but they work just as well with the everyday sun. In my experience, just giving them to children on a normal day and having them look at the normal sun still produces a lot of exclamations. It’s dramatic to see in person that perfect glowing circle without the glare, if you’ve never seen it before.
Solar Filters and Photograph Stacking
For your camera, you can buy “solar filter film” made of the same material as the eclipse glasses. (I had a good experience buying bulk eclipse glasses from the Rainbow Symphony Store, but you can easily find both eclipse glasses for your eyes, and solar filters for your camera — or your telescope — by searching Amazon.) With a solar filter on your camera (or your eyes), you may be able to see a picture of the sun that looks like this:
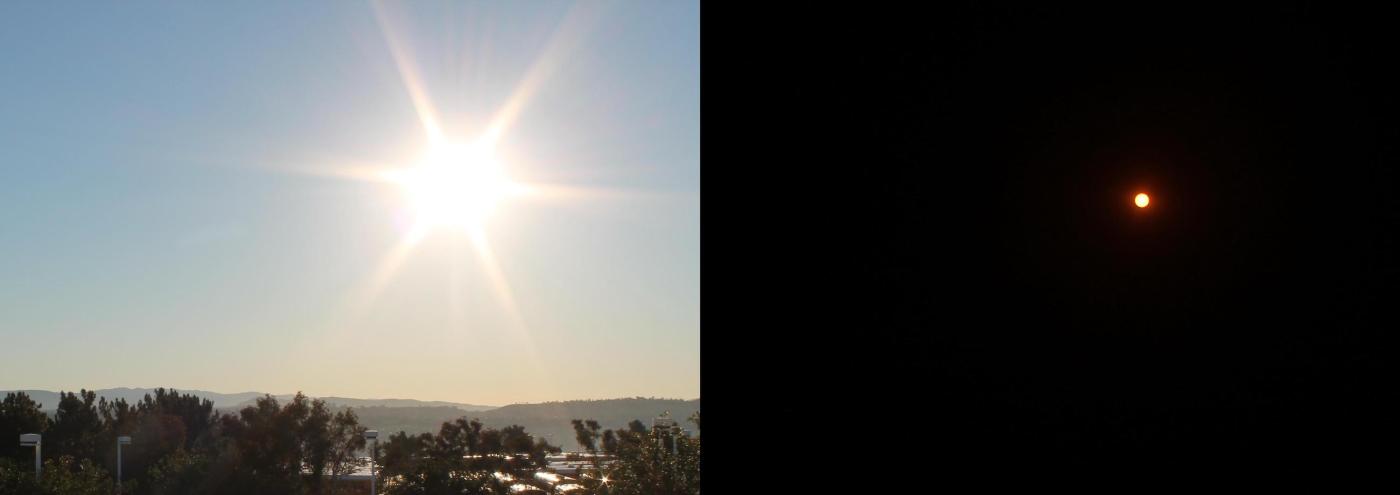
With these high-powered “sunglasses” on the camera, however, we have a new problem. Even if you can manually adjust the focus and the exposure settings of your camera and obtain a nice clear photo of the sun … you can't see anything else. The rest of the picture is black. (This is what prevents the automated features of your camera from working. It's like trying to take a picture of a big star in the black night sky.) However, if you want to see both the sun and the landscape together, it is not too difficult to combine or stack multiple photographs on top of each other. We can start with a nice background photograph without the sunglasses, perhaps taken just before the sun rises, and then overlay several subsequent photographs of the sun with the sunglasses on. (There are different ways you can mix together two photographs. In this case, we simply treat black as “nothing” or “transparent” when we stack the sun photos on top of the background photo.) When we add the photos together in this way, we can make a composite photograph of the sunrise that looks something like this:
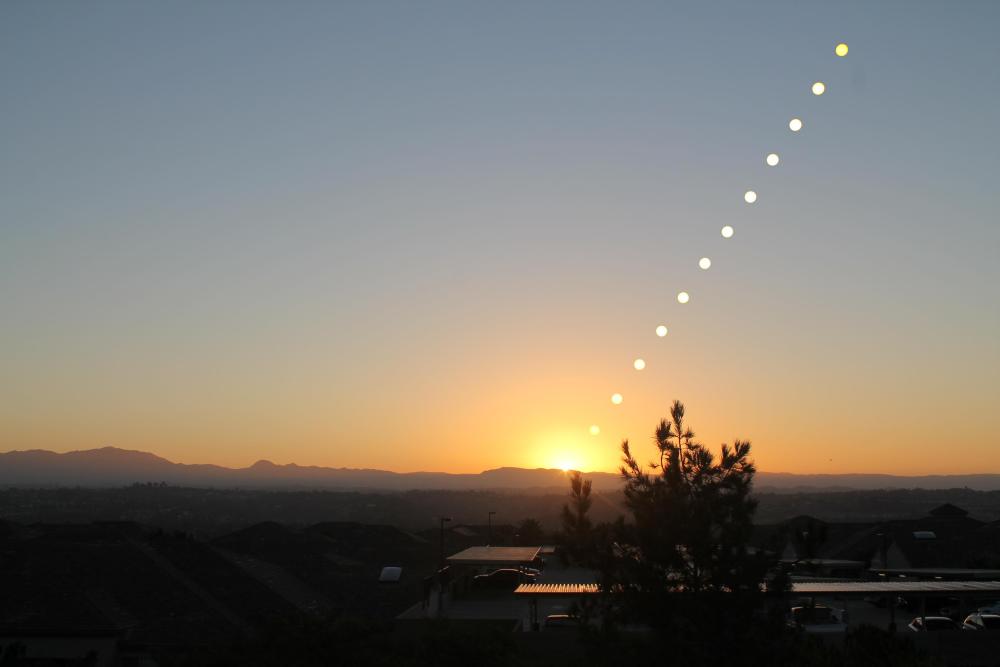
This is a time-lapse photograph I made of a September sunrise in Aliso Viejo, California. Here we finally get to see a beautiful (if I do say so myself) trail of the sun across the sky. Now, with a permanent recording like this of the track of the sun across the sky, what can we can notice about the sun’s motions? For one thing, the sun does not rise straight up into the sky. It crosses the horizon on a diagonal. How tilted is it? It inclines from vertical by about a third of the way over (i.e. about a third of a right angle, or about 30°). When I teach astronomy to children, I like to follow this up later by showing them that the moon and some of the stars rise in the east too, and at the same angle, and that the North Star hovers in the northern sky at the same angle above the horizon, and we wonder why everything in the sky seems to be tilted by this same angle of around 30°. I then show them photos and movies from around the world, and we discover that the angle is not the same everywhere, but varies with how far north or south you go. The circles of the sun stand up straight at the equator, and lie flat at the poles. The reason the sunrise in the photograph above tilts to the right by about 33° is that Aliso Viejo, California lies at 33° north latitude on our world.
Another thing we can notice is that the sun does not speed up or slow down, but marches pretty steadily along its path. My filtered sun photographs were taken at 8-minute intervals, from which you can deduce that the sun travels its own diameter every couple of minutes. (If the sun takes exactly two minutes to travel its own diameter in the sky, and knowing that the sun completes a full circle, or 360°, in 24 hours, can you figure out the size of the sun? Or more precisely, can you deduce the sun's angular diameter as seen in the sky?)
This picture shows us nicely how the sun rose on one particular day. But what about other days? Is the sun’s sunrise motion always the same, or does it rise in different ways on different days? Having made one such photograph, can we make more sunrise photographs on other days to see whether the sun’s path changes as the weeks and months go by? Before I show students my evidence, I usually ask them to guess how it might change. They often guess that the tilt angle will change. What do you think?
Horizon Calendars
Rather than have students make an extensive series of observations every week or every month for many months, I normally just “give away” the fact that the sun’s path changes in a rhythmic pattern every year. The sunrise swings back-and-forth along the horizon each year like a child on a swing set, reaching a northerly extreme on the day we have named the “summer solstice,” picking up speed and passing quickly through due east on the “fall equinox,” then slowing down and rising at a southerly extreme on the “winter solstice,” then turning around and heading back north again. Could we overlay three time-lapse photographs of these three sunrises, to show the annual back-and-forth drifting of the sunrise? I tried, and made this:
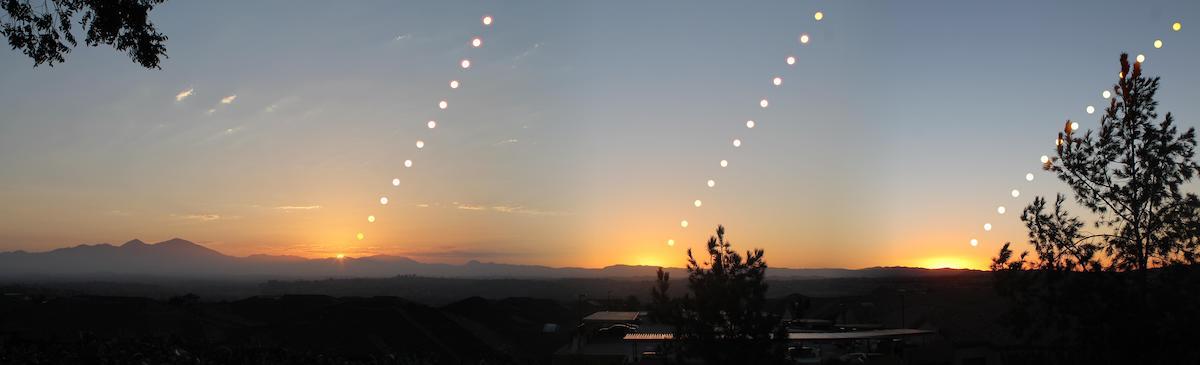
This is a view from the city of Aliso Viejo, California, looking east over Saddleback Valley at the Santa Ana mountain range in the distance. Saddleback Mountain is visible at the left, with the shorter of the two peaks marking northeast (azimuth 45°) as seen from the viewing location. This photo is a blend of three separate time-lapse photographs of the sunrise on Aliso Viejo — one sunrise each at the summer and winter solstices (on the left and right), and one at the fall equinox (in the middle), with the fall equinox sunrise marking due east (azimuth 90°).
We can see clearly in this photo that the location where the sunrise crosses the horizon is what changes significantly with the seasons. We can see that the summer sun rises to the north of east, and heads higher into the sky, while the winter sun rises to the south of east, and stays lower in the sky. This changing path of the sun in the sky changes the duration and intensity of warming each day, and gives to us our seasons.
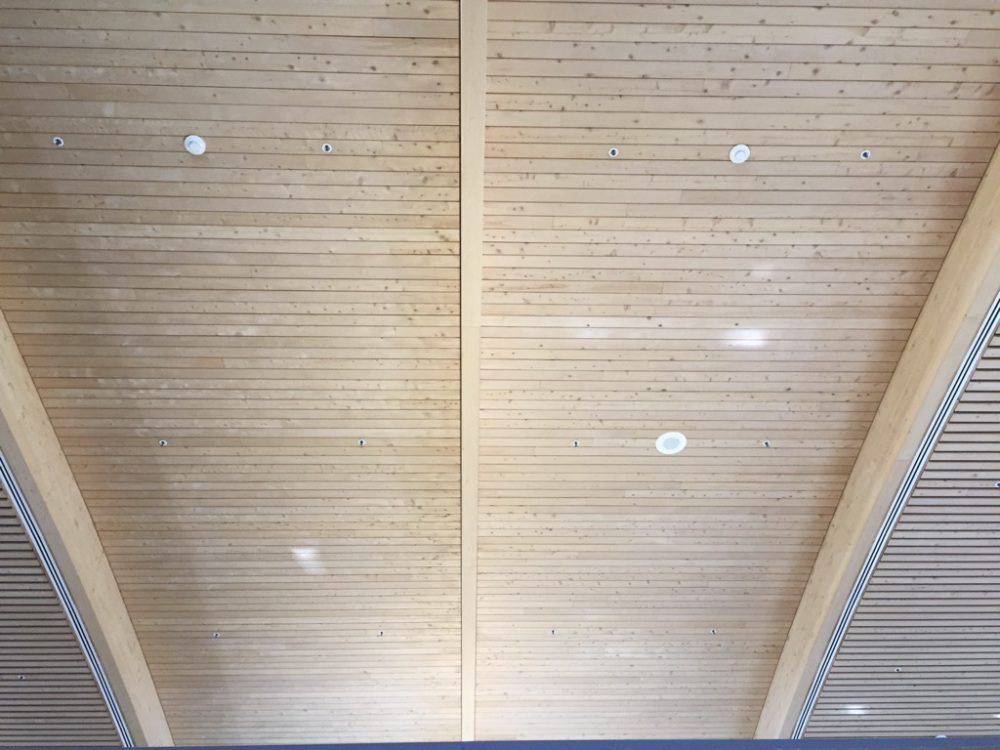
Does the tilt angle change? We can see in the photo that the tilt of the sun circle does not change. Or does it? Keen-eyed students will often notice that the equinox path appears to be a straight line in the photograph, while the two solstice paths appear to curve outwards a little. When I first noticed the curve in the summer photo, I casually assumed it was a projection effect or wide-field distortion of some kind, and I ignored it. But when I finished the winter sequence and finally combined all three photos, it struck me that I was actually recording the sun’s different declination circles in the sky. If you've tracked the sun across the sky, you may have discovered that the sun’s apparent path through the sky on any given day is always a portion of a circle. But we view the circle from different perspectives in different seasons. At the equinoxes, we view the circle from the inside, from the circle’s exact center, so we don’t notice the curve at those times. During summer and winter, we view the sun’s circle off-center, from a little to one side or the other, so at those times we perceive the curve of the circle. I noticed a similar effect when I looked up at the curved ceiling rafters of the Mission Viejo public library. The rafter immediately above me appeared straight, and those on either side appeared to curve outwards, just like the circles of the sun.
As a side note, perhaps I should admit that I cheated just a little with the winter sunrise. I wasn’t happy with the view of the winter sunrise from the camera’s original position, and I also wanted to see if I could catch a few photographs of the sun passing behind a tree, so I shifted the camera by about 15 feet from where it had been for the summer and fall photographs. I’m pleased with the way the winter sunrise composite turned out, but this also meant that the winter and fall photographs didn’t overlap well. I tried to hide this when I smoothed the two photographs together. I also tried to be more careful when planning my angles for a sunset panorama to complement the sunrise panorama… but there are always new lessons to be learned.
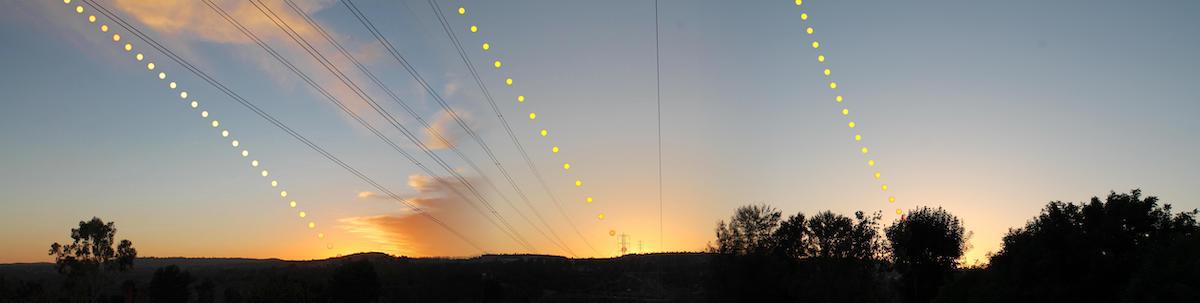
When I chose the location for this set of sunset photographs, I thought I’d be able to create a little visual interest by capturing the sun passing behind the power lines. But it’s difficult to know ahead of time, with precision, exactly where the solstice and equinox paths will be, and it turned out that my solstice and equinox paths passed right alongside the power lines without crossing. I still like the effect, but not as much as I’d hoped, although I did catch a nice photo of the equinox sun setting just behind one of the wire suspension towers. The vertical line is another pair of power lines. I thought I’d be clever and use one of the power line doublets as an alignment aid — every time I set up the camera, I’d step left or right until I could see only one wire above me instead of two, thus ensuring that I was vertically underneath the pair of wires every time. It worked fine, but I’m not sure I like having the stray vertical line in my photo, especially since this one failed to ever intercept the sun as well. You can’t control the weather, but the other lesson I learned was to try to avoid having clouds in the regions where you will need to blend the photos. Otherwise you have to cut clouds in half.
After I moved from California to Iowa, I started working on similar photos overlooking the Iowa corn fields. The weather is much less cooperative here than it was in California, but I did manage to obtain a sunrise panorama, analogous to the previous one I made in California:
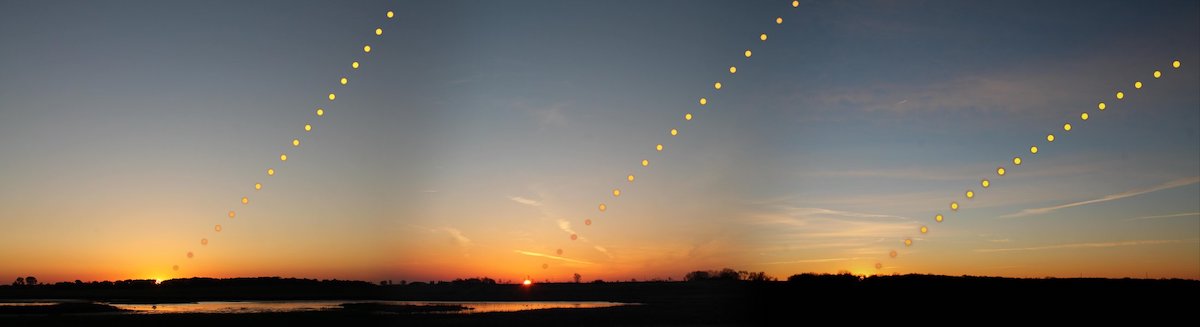
At the new latitude of about 43°N, you can see that the sun trails are tilted over a little more. This time, the path of the sun inclines at about 43° from vertical, rather than 33°. (You might also notice a little difference in the appearance of the suns. I used shorter exposure settings in the camera when taking photos of the filtered sun, making the suns a little more colorful. Instead of white, they are now somewhat yellow when higher in the sky, and orange when lower. I also tweaked the blending technique a little, so the sun images blend a bit more smoothly into the background colors, and gradually fade into the sunset sky.)
Tips and Suggestions
I didn't intend for this post to be a tutorial on astrophotography, especially since I'm far from an expert on the subject, but I can offer a few suggestions if you want to try making similar photographs of your own.
Camera and Filter — You could try using the camera in your mobile phone if you have one, but I don't think you'll have much success with it. I own a Canon Rebel, and I used it for all of my solar photographs, although any camera that allows you to adjust the exposure settings manually will probably work. For the solar filter, I started out using cheap “eclipse glasses” made especially for cameras — they are basically circles of solar filter film inside a press-on cardboard lens cap. I found mine to be unwieldy, however. I kept shifting the camera when I put it on or took it off. Instead, I bought a sheet of solar filter film and an empty metal filter ring and made my own screw-on filter for my DSLR, and it works much better. I can gently attach it and detach it without otherwise disturbing the camera. The manufacturer of the film also claims you can just wrap it over the lens and hold it in place with a rubber band, but I have never tried that. You can also buy commercial solar filters made specifically for your camera (or for your telescope), but they are more expensive.
Focus and Exposure — Setting the focus was usually pretty easy. I would just take an initial photo without the filter, using the autofocus, and then I would just be careful never to bump or adjust the focus again. (I had to gently switch the focus from “auto” to “manual” to ensure that the camera didn't try to adjust the focus again, either.) Adjusting the exposure settings was a little trickier. It requires a little practice and personal familiarity with your camera. I suggest just starting with the ISO speed and the F-stop or aperture set to low or moderate values, not the camera's minimum values but close to them, perhaps F20 and ISO 200-400, and a shutter speed of perhaps a quarter of a second, and then playing around with tweaking the settings from there to see which ones give you the best results.
Accessories — I also recommend a versatile but sturdy tripod without any wiggle room in the mount. You want to be able to easily adjust the camera’s angle in multiple directions while you are getting set up, but you also want to make sure that the camera doesn’t move between the beginning and end of your sunrise sequence. I ruined one or two sunrise sequences because my discount-brand tripod had too much wiggle room and the camera shifted position as I made adjustments. I bought an Amazon Basics tripod for about $25 and for the price, I’ve been extremely happy with it. For making sure I take photographs at regular controlled intervals, I have used both my laptop computer running software that came with my camera, and an external camera timer that I bought for about $25. The computer worked fine, but the timer was far more convenient. And more weatherproof.
Image Processing — For blending the photographs, I used computer scripts that I wrote myself, but there are several commercial and open-source software options available. For stacking photographs, I have used the free software StarStax and found it to be helpful and easy to use, but you could also use Adobe Photoshop or the free software Gimp if you are familiar with those. For combining multiple photographs pointing in different directions into a single panorama, you could crudely overlap and blend them using image-editing software such as the free Inkscape, but if you want to use a fancier and cleaner stitching algorithm, you will probably need commercial software. Adobe Photoshop is popular, but you can probably find other options by searching the internet. I think Gimp can stitch photos, but I've never tried it.