
A Toy Lung
How to make a working model of a mammalian respiratory system from cheap party supplies.
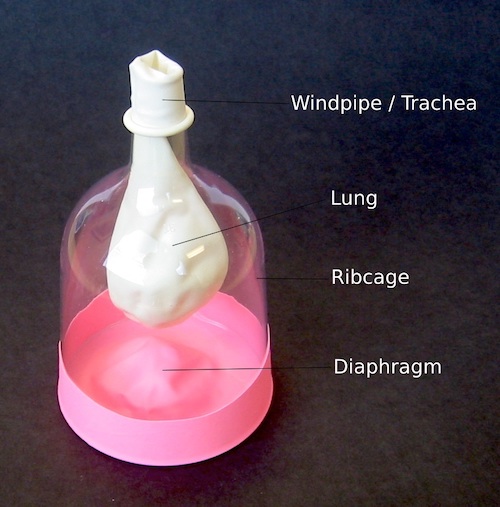
Here is a simple craft project which results in a working model of a lung and diaphragm. The parts are cheap and available in bulk, and the assembly is pretty easy, making this a good project for classrooms. For each toy, you need a plastic wine glass, a 9“ diameter balloon, and a 12” diameter balloon. All of these cost a few cents apiece and are available at any party supply store.

The wine glass will be overturned, in which case the stem makes a good analogy to the windpipe, and the cup makes a good analogy to the ribcage. A piece of rubber fabric stretched across the opening will mimic the diaphragm, and a smaller balloon threaded through the stem will mimic a lung. The whole assembly looks like this:
Making the Model
The only pre-class preparation that is needed is to remove the tip of the wine glass stem, and thus create an opening. It is possible to cut the stem with a scissors or shears, but this tends to create numerous cracks and splinters in the brittle polystyrene. You can easily saw off the tip with a hacksaw, which results in fewer shards and splinters, but still tends to leave a frayed and jagged surface. In either case, you can easily smooth and melt away any burrs and sharp edges with the brief application of a small flame from a lighter or candle. Be careful, however, because the plastic can catch fire. (The combustion itself is slow and not particularly hazardous, but the fumes of burning plastic can be toxic. Just touch the flame to the plastic long enough to round off any sharp points or edges.) I assume it is also possible to use a hot-wire cutter, although I have never tried this myself. A fine-toothed hacksaw is my preferred tool.
To assemble the toy, the small balloon needs to be threaded through the neck or “windpipe” of the glass, and then folded back over the opening to help hold it in place. It should cling to the neck tightly enough to create an air-tight seal. Twisting the balloon into a straight shaft and gently turning it while pressing it forward through the stem of the glass is usually easy enough. Once the lung is in place, the diaphragm needs to be cut out and attached. Cut off the top half or two-thirds of the large balloon, producing a puckered disk of rubber fabric, something like a swimming cap. This disk then needs to be stretched over the opening of the cup, making an air-tight seal, just as the diaphragm in a human (or any mammal) seals the bottom of the “thoracic cavity”. You will probably want to have some spare wine glasses on hand, because the plastic is brittle and can easily crack as children try to force the diaphragm into place all the way around the perimeter.
The toy works better if the balloon is partially inflated when the diaphragm is in the “neutral” position. It may help to blow a little air into the lung before attaching the diaphragm. Or, if a child has already assembled his lung, loosen the diaphragm, allowing air to escape from the cup, blow gently into the “lung” to inflate it just a little, then release the diaphragm resealing the “ribcage”.
Once the toy is assembled, if you pinch the diaphgram and pull out, the lung will inflate. If you press in, the lung will deflate. If you alternate rapidly (but gently) between pushing and pulling, you may be able to hear the huffing, and if you hold the “mouth” of your toy lung near your skin, you may be able to feel the “breath” being exhaled.
Similarities and Differences From a Real Respiratory System
If you have ever dissected the torso of a small mammal, you may have noticed that the chest forms a closed chamber with stiff walls (the thoracic cavity), with a small aperture at the top where the throat sits, and sealed across the bottom by the diaphragm, a dome-shaped sheet of muscular fabric, stitched tightly to the bottom of the ribcage all around the perimeter. In the basic mechanical structure, we have made a pretty good model with our balloon-and-wineglass. One pretty obvious difference is that there is only a single lung, instead of a pair, but I didn't find that this distracted students in the slightest from thinking about how it works. (I would even discuss these similarities and differences with them explicitly, and ask if they thought that this was a big problem with our model, and they usually agreed with me that it wasn't.)
A more significant difference lies in the nature of the lungs. If you have ever dissected a small mammal, or examined a specimen of sheep pluck, you may have noticed something very important about the lungs. They are not simple balloons. They are not loose, floppy, and sack-like, but sponge-like, and they are remarkably heavy and dense. (It is regrettable that one cannot obtain lungs as food in the U.S., otherwise you could easily dissect fresh specimens.) On the other hand, if you have ever dissected a frog, you may have noticed that in that case the lungs are balloons, or nearly so. For an amphibian, lungs are only a minor aid to breathing, and they are formed of small, loose, flimsy fabric sacs, perhaps with a couple of small folds or compartments on the inside. Frogs also lack a diaphragm. But for the warmer and much more athletic birds and mammals, the breathing equipment needs to be much more powerful, with a special breathing muscle to pump the lungs, and with much denser, thicker air-sponges to soak up the air. (Or if you wish to be more precise: to exchange oxygen and carbon dioxide at a much greater rate due to the much greater surface area.)
Another minor difference between our model and a real mammalian respiratory system lies in how the diaphragm pumps the lungs. As I mentioned, the toy lung works best if the lungs are partially inflated with the diaphragm resting in the neutral position. Then you can press in to create an “exhale”, and pull out to create an “inhale”. However, in a mammal, the resting position is with the lungs mostly deflated, and the diaphragm already “pressed in”, in its characteristic dome shape. You can observe this in your own breathing: if you let your torso go completely limp, the natural elasticity of your lungs will act like a released balloon, and will naturally expel the air in a sigh. The diaphragm exists primarily to power the action of inhaling. Like all muscle tissue, the diaphragm is incapable of pushing, and can only pull. It contracts and stiffens when activated, and relaxes when not. In the case of a dome-shaped muscle, this causes it to attempt to pull downward and flatten out, pulling on the lungs, and causing them to expand and draw in air. With our toy, pull = inhale, push = exhale. In reality, pull = inhale, relax = exhale. It's a subtle distinction, but one worth mentioning. (In reality, we also have several “helper” mechanisms for when we want to breathe in or out quickly or forcefully, for example to take an extra deep breath or to blow out a candle. But the primary everyday breathing mechanism is still the alternation between pulling and relaxing in the diaphragm muscle.)
As a final note, I found that when students started playing with their toy lungs, they were often bewildered by how the “diaphragm” can make the “lung” move without touching it. When you pull down on the diaphragm, the lung starts to expand for some very mysterious reason. In a course on biology, it isn't really appropriate to get into a full exploration of vacuum and air pressure, so I would normally flesh out and clarify the question a little, and then just place a metaphorical bookmark on the issue for detailed analysis at a later date. For example, many students may have noticed that when they are washing dishes, if they submerge a glass, then turn it bottom-end up and try to lift it out of the water, the water stays in the glass (as long as the mouth of the glass is still underwater). The water doesn't fall down, even though it seems like it should. If you have two small microscope slides, or other small pieces of plate glass, you can press them together, and hold the top one by the edges, and the bottom one won't fall down right away, especially if they are wet. There are numerous examples where it seems like something should move, but it doesn't until or unless air or water can flow in to take its place. There are numerous examples where an expected motion would leave empty space behind, and for this reason, apparently, the motion that we expected doesn't happen. It seems like “nature abhors a vacuum”. Now, this expression does nothing to explain what's going on. Emotions of disembodied “nature” don't really qualify as scientific causes. But this historical expression is a perfect description, a sort of verbal summary, of a class of interesting phenomena. So for now, let's say: “We don't know why yet, but for some reason, it seems like nature really doesn't want to allow empty spaces to form. For some reason, nature abhors a vacuum”, and we'll leave it there until we can investigate further.